Title Blocks 102
Table of contents
Title Blocks 102: Smart Tabs, Smart Text

Today we’ll continue our discussion of title block topics by talking about how to control the location of text chunks in a shape’s text block.
Sure, Visio text has tabs, which we’ll put to use. But in the wrong hands and on the wrong shapes, tabs can blow up in your face!
But never fear, for today we introduce the concept of Smart Tabs. Smart tabs are tabs that organize your text properly, even when your shape changes size!
Creating a Basic Field-name/Field-value Text Block
Before we get too far down the line, we’ll want to create a basic text block shape that contains two items: a field-name and a field-value. Ultimately, these fields will be linked to data, but for now, they can just be typed-in text, separated by a tab. The goal will be to end up with two styles of blocks, which look something like this:
Visio Guy Title Block Series
If you’ve read our first two articles on creating and customizing Visio title blocks, then you’ve learned a lot about what can be done as far as linking shape text to shape data. If you haven’t seen the articles, you can check them out here:
- Title Block #2: Let’s Make a Multi-field SmartShape!
- Title Blocks #1: How to Display Existing Document Information
We won’t go into the details of linking text to data in this article, since you’ve got these other articles at your disposal.
Visio Doesn’t Do Tables
Visio shapes can not only contain data in Shape Data fields, but they can also link that data to text that is displayed on the shape itself.
But often times we want to show more than one field, and give descriptors to each field to boot. As soon as we have multiple fields, we also want to control how they are positioned and organized on the shape–preferably in neat rows and columns.
In a web-page or Word document, you’d simply insert a table. But Visio doesn’t support tables in shape text blocks.
You could use multiple shapes to form rows and columns, but this gets inefficient, and the linking of Shape Data fields to so many separate shapes can be tricky, confusing and lots of work!
Basic Tabbery: Setting Up Our Shapes
So let’s get to illustrating the problems and solutions, since we are Visual People!
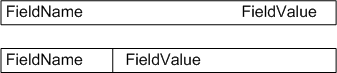
Below, we see two shapes that both contain a field-name and a field-value. These text items could be linked to real data stored in the shape’s Shape Data fields. They are both efficiently constructed, having two bits of data are stored in a single shape.
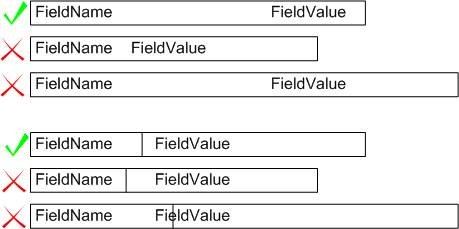
There is a tab between the field-name and the field-value, but the tab-locations still leave something to be desired:
Note: The second shape is a single shape, not two rectangles. It was created by drawing a rectangle, then drawing a vertical line 1/3 along the way from the left, selecting both shapes at once, and finally choosing: Shape > Operations > Combine from the menu.
And if you’re wondering about inserting linked fields, we’ve talked that before in the article: Title Blocks #1: How to Display Existing Document Information
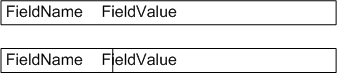
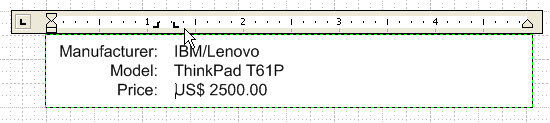
Now, we’d like to configure the tab stops so that our text is aligned more like this:
Visio’s Text Ruler
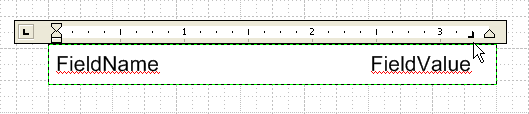
We can accomplish this by using Visio’s Text Ruler, which is similar to that found in Microsoft Word. Since each shape has a slightly different tab setup, let’s look individually at how each one was configured.
In the first shape, the tab is set to right-aligned, and located such that the field-value appears at the end of the shape. The field-name is at left and doesn’t require any fancy configuration, other than that the entire shape is set to left-aligned paragraph text.
Note: If you don’t see the nifty text ruler while you’re editing a Visio shape’s text, just right-click and check Text Ruler (while you’re in text-edit mode!)
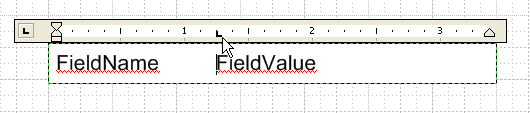
In the second shape, the tab is left-aligned, and located roughly 1/3 of the way along the shape:
That wasn’t so hard. And the shapes look much better already!
Both of these shapes are now good candidates to be parts of a title block, whose data fields get populated in any number of ways. A user might manually enter values in the Shape Data window for the title block shape, or an automated solution might programmatically set the data when, say, a new project gets created.
Tabnation! What Happens When the Shape Changes Size?
Now we’ve got two fine-looking shapes. Both with two fields and one tab stop. These shapes are likely to be parts of title blocks on the drawing, and are likely to change size depending on the paper size, the available space on the drawing, or the whims of the user.
What Bad Tabs Look Like
The big problem arises when we resize the shapes:
What a mess! In some instance the field-values have just stayed put, ignoring the size of the shape. In other instances, they’ve jumped around randomly.
You can see that the first shape’s field-value does not stay aligned to the right side of the shape, and the second shape’s field-value doesn’t match up with the vertical line.
Something’s got to be done!
What Good Tabs Look Like
What we’d really like to see is this:
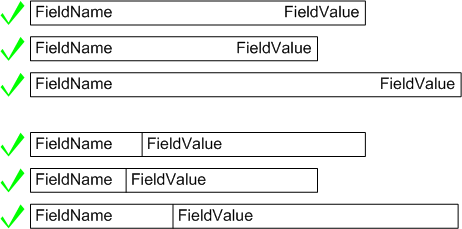
That definitely looks much better! And Smart Tabs are the way to get this to happen!
How to Create Smart Tabs
In order to create the smart tabs, we start with the shapes that we’ve already created– inserting tabs and specifying their alignment. Nothing special about that.
Once that’s set up, we then must venture into the ShapeSheet and smarten-up the tab-stop positions by using ShapeSheet formulas.
The Tab Section of the ShapeSheet
If you select a shape such as one of the two blocks we’ve been talking about, then choose: Window > Show ShapeSheet from the menu, you’ll be presented with a big, scary Excel-spreadsheet-looking interface.
About half-way down, you should find a section called Tabs. If you don’t see this section, go to View > Sections and click Tabs near the bottom of the middle column of check boxes.
The first column in this section is called Position, and it is the position cells that we are interested in. As they stand now, the position cells will contain fixed values. We want to change that by creating smart formulas that make these positions dynamic.
Smart Tab ShapeSheet Formulas
So for a tab like the top shape’s, where the field value text should stay aligned at the right end of the shape, we enter a formula like this:
Tabs.Position = GUARD( Width – LeftMargin – RightMargin )
GUARD protects the expression from being overwritten, especially when the shape is duplicated.
Since the text should be all the way to the right of the shape, we set the position to Width, which is the length of the shape. But the text block is slightly less than the width of the shape, due to margins, so we subract off LeftMargin and RightMargin to get things just right.
If you peruse the ShapeSheet some more, you’ll find that Width, LeftMargin and RightMargin are all cells in the ShapeSheet. Just as in Excel, you could have built the formula by clicking on those cells while entering the expression.
For the bottom shape, the formula is a bit simpler. We want the tab to be at 1/3 of the width of the shape, so we enter:
Tabs.Position = GUARD( Width/3 – LeftMargin )
In this case, only the LeftMargin figures in to the correction, since we are only locating the tab relative to the left side of the shape.
Additional Features
With smart tabs, your shape’s text is well behaved.
And without building-in any more smarts, your shapes are more capable than you think!
Multiple Lines of Text
Since tabs apply to columns, you can enter several sets of data–each on a new line– and they will all look wonderful, no matter how you size the shapes! Just have a look:
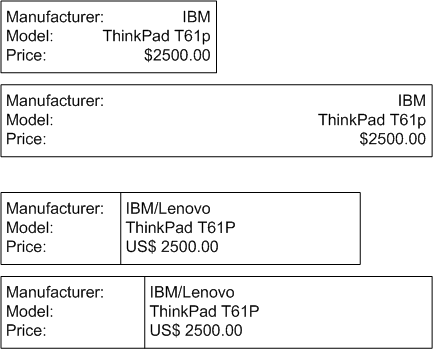
You’ll note that the “1/3″ shape is a bit restricted, because, in this example, the field names are comparable in length to the field values. So the 1/3 location doesn’t make a lot of sense, and wastes a lot of space.
Control Handles and Multiple Tabs
Since the “1/3″ shape potentially wastes all that space, we can parameterize the location of the divider-line, and thus the location of the tab. What follows is a brief description of how we could improve the second shape even more. I won’t go into gory details and tons more pages. But I’ll point you in the right direction and hit the major points of what needs to be done.
Adding a control handle to the shape offers the user a great way to graphically alter the position of the divider. Below, you see the yellow diamond that represents the control handle:
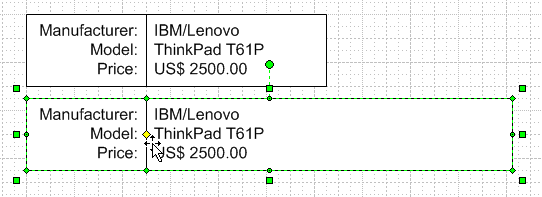
Users can simply tug on the control handle to move the line and the corresponding tab stops, but only after we link tabs and geometry to the control handle.
We inserted this control handle using the ShapeSheet’s Insert > Section command. We then gave the new Controls row the name of dividerPosition. The row name is the red text on the very far left of a row. You type in “dividerPosition”, then hit enter. You’ll then see “Controls.dividerPosition” when you’re done. But you don’t need to type in “Controls”.
We then referenced the position of the control handle in the geometry of the vertical line:
Geometry1.X1 = Controls.dividerPosition
Geometry1.X2 = Controls.dividerPosition
You’ll also notice that the field name is now right-aligned at the dividing line. In order to do this, we had to enter a tab before the text. And correspondingly, we had to define a new tab location. So now we have two tabs: one just to the left of the line, and one just to the right of the line:
Two tab locations now require two smart tab formulas, and they look like this:
Tabs.Position 1 = GUARD( Controls.dividerPostiion - Char.Size/2 – LeftMargin )
Tabs.Position 2 = GUARD( Controls.dividerPostiion + Char.Size/2 – LeftMargin )
Most of this should look familiar, except that now we are adding and subtracting Char.Size/2.
Char.Size is just the font size for the text. You’ll find the Char.Size cell in the Character section of the ShapeSheet. I’ve used it in our smart tabs so that the text isn’t jammed up against the line, but instead leaves a bit of space.
We could have subtracted and added a fixed value, like +/- 2pt, but I figured it would look better if the spacing grew and shrunk proportionally to the size of the font.
- © Copyright 2024 D-Tools