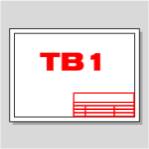
Title Blocks 101
Table of contents
Title Blocks 101: How to Display Existing Document Information
Title Blocks #1: How to Display Existing Document Information
 Title blocks on drawings are important for many, many reasons.
If your company has created more than a small number of drawings, it’s useful to know who created them, when they were created, who updated the drawings, and when they were updated.
Often times, copies of a drawing are e-mailed or sent in printed form to customers, installers, contractors, builders, inspectors. For these recipients, contact information and drawing scale data can be of utmost importance.
As it turns out, much of the information that is imperative to title blocks is already in the drawing. Through Visio’s SmartShape features, it can automatically be extracted, eliminating the need to re-key it.
Other information that is not available by default can be entered in a central location, or extracted from existing data sources, then displayed by cleverly-constructed title block shapes.
This article is a first in a series on how you can use Visio’s built-in features, ShapeSheet capabilities and even automation code to make smart Title Block shapes that save you work.
Save Time by Using Existing Title Block Shapes
Before we spend time creating shapes from scratch, I’d like to note that there are a bunch of pre-made master shapes that can help you to construct title blocks.
The stencil is called: Title Blocks.vss.
In Visio 2007 Professional, you can find it by navigating the main menu to:
File > Stencils > Visio Extras > Title Blocks
While this stencil has been around for several versions, I am not 100% sure if it ships with the Standard version of Visio. So there’s an outside chance that you might not have it on your PC.
The stencil contains several pre-made title block shapes, some drawing frames, some borders, and a whole slew of elemental boxes that you can use to assemble to make your own text blocks.
By elemental box, I mean a box that has a field label, and a field value. An example might look like this:
[ Creation Date: 10/20/2008 ]
Here’s a peek at the shapes in the Title Blocks stencil:
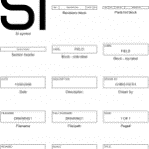
click image to see larger version
One key point to note about the elemental shapes: Many of them are already linked to information about the document, so you don’t have to re-enter any information!
Link to Existing Information by Inserting Fields
If you don’t have the existing Title Block shapes, or you don’t like them, or they are missing something you want, or you’re just a Visio Guy and like to build things yourself, then Visio offers a handy way of linking shapes to existing document information.
Under the Insert menu, you’ll find the Field… item. This allows you to link the text on a shape to a bit of information stored in the document.
Let’s create a simple example that shows the creator of a document. Just follow the steps below:
- Draw a rectangle on a Visio page
- Enter text-edit mode by either: double-clicking the shape, or selecting it and pressing F2
- Select Insert > Field from the menu
- Choose a Category and a Field name from the various options in the dialog
You should see something like this:
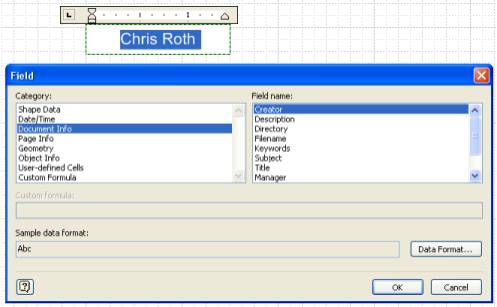
When you install Microsoft Office, it asks you for your name, and automatically inserts this into newly-created Office documents. Here we can see that Visio automatically found my name and listed it as the creator of the document.
If you’re interested in where this field is stored, have a look at the dialog under File > Properties. It looks similar to what you’ll see in other Microsoft applications:
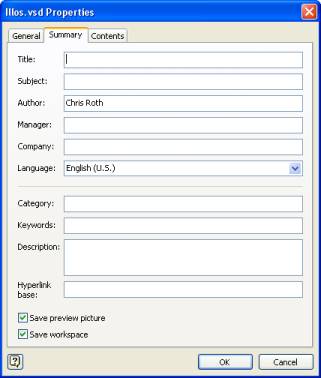
And you can see indeed that the creator matches what we’ve got on our shape.
Which Information can be inserted as a Field?
You might have noticed that there are quite a few fields that you can insert. Instead of forcing you to tediously explore the Insert Field dialog, I’ve conveniently listed all the fields for you right here:
| Shape Data | |
| Date/Time | |
| Creation Date/Time | |
| Current Date/Time | |
| Last Edit Date/Time | |
| Print Date/Time | |
| Document Info | |
| Creator | |
| Description | |
| Directory | |
| Filename | |
| Keywords | |
| Subject | |
| Title | |
| Manager | |
| Company | |
| Category | |
| Hyperlink Base | |
| Page Info | |
| Background | |
| Name | |
| Number of Pages | |
| Page Number | |
| Geometry | |
| Width | |
| Height | |
| Angle | |
| Object Info | |
| Data 1 | |
| Data 2 | |
| Data 3 | |
| ID | |
| Master | |
| Name | |
| Type | |
| User-defined Cells | |
| List of User-defined cells that a shape might | |
| Custom Formula | |
| Any valid ShapeSheet formula | |
Some of the fields, like page Name and Page Number are extra clever. They are smart enough to work from background pages, but reflect foreground-page information.
For example, imagine that you created a title block element that shows the page number and total number of pages–something like: “1 of 4″, “2 of 4″ and so on.
You could then place just one single title block on a background page, and each foreground pages would nevertheless show the correct page number and count, even though there is only one title block shape!
Unfortunately, this foreground/background awareness doesn’t work for all inserted fields.
Add Both the Field Name and Field Value to One Shape
We’ve seen how easy it was to add “Creator” to the text of a simple rectangle. But title block elements usually come in pairs: a field name, and a field value. Sure, we could just draw another box and type “Creator:” in it, but wouldn’t it be nice to combine the name and value into one text block?
It turns out that you can insert multiple fields in a shape’s text block, and mix them with text that you type as well.
So we can simply type “Creator” first, then insert the Creator-field at the end of the text. Simple enough, but the alignment of the text might not look right–especially if we have lots of fields stacked on top of each other.
Imagine several left-aligned fields on top of each other. They might look like this, all jammed up against the right side:
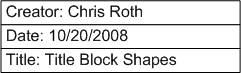
Not very title-block-ish now, is it? I think we can agree, that a title block should look more like this:
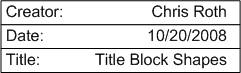
We can accomplish this using some of Visio’s built-in text-editing features. Below, I’ve first left-aligned the whole text block, using the button on the Formatting toolbar.
Then, I entered text-edit mode and added a right-aligned tab near the end of the text block. That’s the little “L” shape you see highlighted below:
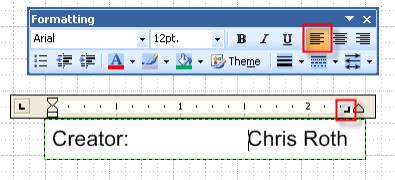
To get this to work properly, you have to first type “Creator:”, then hit the TAB key before inserting the Creator-field.
How Inserted Field Affect the ShapeSheet
If you have delved into the ShapeSheet and like to tweak your SmartShapes, you might be interested in what goes on behind the scenes. After you insert a field into a shape, you can see the changes reflected in the ShapeSheet behind the shape.
You’ll see that a new row is added to the Text Fields section, and it holds information about which field was inserted, how to format it, and a few other options.
Below, we see that the CREATOR() ShapeSheet function was inserted. This makes sense, since we chose to insert the Creator field.
![]()
If you’re guessing that there’s a ShapeSheet function that corresponds to every option in the Insert > Field dialog, then you’re right!
You might also correctly note that once a field has been inserted into a shape, you can quickly change the field via the ShapeSheet: You don’t have to go back and select the text.
For example, we could change the formula in the Value cell above from CREATOR() to “[" & CREATOR() & "]“. The shape would then display [Chris Roth], because we concatenated brackets before and after the field.
Inserted Fields and Corresponding ShapeSheet Functions
Below is a list of the Insert > Field options, with the corresponding ShapeSheet function listed next to it.
| Shape Data | Examples:Prop.Cost |
| Date/Time | |
| Creation Date/Time | DOCCREATION() |
| Current Date/Time | NOW() |
| Last Edit Date/Time | DOCLASTSAVE() |
| Print Date/Time | DOCLASTPRINT() |
| Document Info | |
| Creator | CREATOR() |
| Description | DESCRIPTION() |
| Directory | DIRECTORY() |
| Filename | FILENAME() |
| Keywords | KEYWORDS() |
| Subject | SUBJECT() |
| Title | TITLE() |
| Manager | MANAGER() |
| Company | COMPANY() |
| Category | CATEGORY() |
| Hyperlink Base | HYPERLINKBASE() |
| Page Info | |
| Background | BKPAGENAME() |
| Name | PAGENAME() |
| Number of Pages | PAGECOUNT() |
| Page Number | PAGENUMBER() |
| Geometry | |
| Width | WidthThis is a ShapeSheet cell, not a function |
| Height | HeightThis is a ShapeSheet cell, not a function |
| Angle | AngleThis is a ShapeSheet cell, not a function |
| Object Info | |
| Data 1 | DATA1() |
| Data 2 | DATA2() |
| Data 3 | DATA3() |
| ID | ID() |
| Master | MASTERNAME() Returns <no master> if shape has no parent |
| Name | NAME() |
| Type | TYPEDESC() |
| User-defined Cells | |
| List of User-defined cells that a shape might | Examples: |
| Custom Formula | |
| Any valid ShapeSheet formula | Examples:Prop.Cost * Prop.Resources User.txt |
Shape Data and User-defined cells show a list of those cells that might be contained in the shape, so the list can vary widely from shape to shape.
With Custom Formula, the world is wide open to any valid ShapeSheet formula you can come up with. A great one to try here is the shape’s area: just enter: = Width * Height as the formula.
In the matrix above, I also concatenated the text “Area = ” on to the formula, but you could also enter this as static text in the shape, then insert the calculation after it.
Super-smart Title Block Element: A Multiple-field Box
As a closing teaser, I’ll leave you with some food for thought: With the information we’ve talked about, and a bit of ShapeSheet know-how we can build Text Block Element Shapes that “do it all”.
The shape I’ve built below incorporates all of the Date/Time functions we’ve talked about before into one single SmartShape:
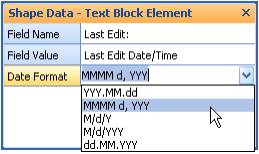
Using the Shape Data window, we can enter the text for the field name, which shows up on the left-hand side of the shape. Then we can select which bit of date/time info to show using the drop-down list:
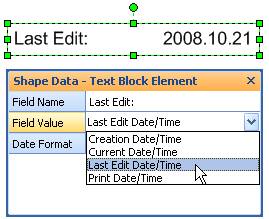
Using the third data field, we can set the date (or date-time) format. Several options are pre-entered, but you can add more, since it is an editable list:
So with one single SmartShape, we can create a Text Block that has four different pieces of information, and we don’t need to mess around with the Insert > Field dialog at all!

You might also note, that although the text blocks are wider here than the first “Last Edit” box shown above, the text is still properly left- and right-aligned.
This was accomplished using what I call “Smart Tabs”–essentially ShapeSheet formulas in the Tabs section of the ShapeSheet. But that is a discussion for a future article.
You can download our Multi-text-block element here, and have a look under the hood to see what makes it tick:
Download: date-and-time-multi-title-block-element (59 KB)
Title Blocks: What’s Next?
In the coming weeks and months, we’ll talk more about how we can create SmartShapes that make “Title-blocking” easier and more efficient. Topics we might discuss include:
- How the SmartShape above was created
- Building one SmartShape that contains ALL of the Insert > Field options
- Using “Smart Tabs” to make text positioning better and more flexible
- Storing data centrally in the Document’s ShapeSheet
- Using Anti-scale ratios to get text and title blocks to behave in scaled drawings
- Getting and setting Title Block information using VBA Code and custom forms
- Creating smart drawing frames that automatically fit the size of a page
Let us know which of these topics sounds the most interesting, or suggest your own!
We can cover many, many aspects of Visio solution development within the context of title blocks and frames. And I think it is a good place to start the discussion, since practically every Visio-based solution I’ve ever worked on has required some amount of title-block-related development.
- © Copyright 2024 D-Tools