Product DataMatrix
Table of contents
- Product DataMatrix (PDM)
- Add Product/Package
- Edit Selected Product/Package
- ...... Delete All Selected Products/Packages
- ...... Save
- ...... Filter
- ….. Search Products
- ...... Refresh
- ...... Add and Remove Columns/Groups
- ...... Sort
- …….Line Item Summary
- ... Assign
- ...... Export to Excel
- ...... Update Price
- ...... Update Case
- ...... Open in I/O Studio
- …… Google Product Search
Product DataMatrix (PDM)

This section is where all of the Products that have been added to a Project are displayed. There are various buttons along the top of this section:
![]()
 Add Product/Package
If you click the button, the Add Product form opens. Use the dropdown arrow to add a Package.
 Edit Selected Product/Package
once you have selected a Product or Package in the PDM, clicking this button will open the Product Properties or Package Properties form. Double-clicking the Product or Package in the PDM results in the same action.
 ...... Delete All Selected Products/Packages
You can select multiple Products or Packages in the PDM by using the [Shift] or [Ctrl] keys on your keyboard.
 ...... Save
Saves your progress in the Project. Use frequently.
 ...... Filter
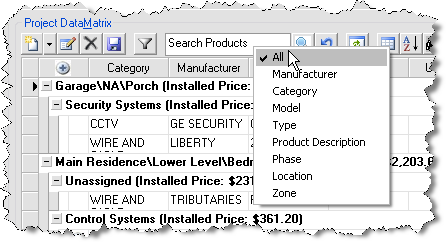
Allows you to filter your PDM by Manufacturer, Category, Type, Phase, Location, or Zone. You also have the ability to Search for Product based on the Model, SKU, and Product Description fields.
 ….. Search Products
This will allow you to search through products that have been added to the PDM. The default search fields are: Manufacturer, Category, Model, Type, Product Description, Phase, Location, and Zone. If you want to narrow your search to a single field you can do so by right-clicking in the Search window.
 ...... Refresh
Changes made to Products and Groups may not immediately show in the PDM view. Use this button to refresh the PDM view.
 ...... Add and Remove Columns/Groups
Allows you to customize the view of the PDM, very similar to how you customize the view on the Product Grid screen in the Manage My Product Data (MMPD) interface. You can choose what columns display in the PDM as well as choose how you want the Products and Packages to be grouped.
 ...... Sort
Allows you to sort the Products and Packages in your PDM by various fields up to three levels deep.
 …….Line Item Summary
Allows you to modify the display of the PDM as well launch different views of the data in separate windows. Details below.
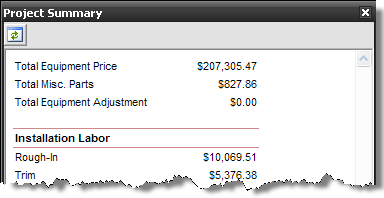
Project Summary
Displays a summary of the project in a separate window
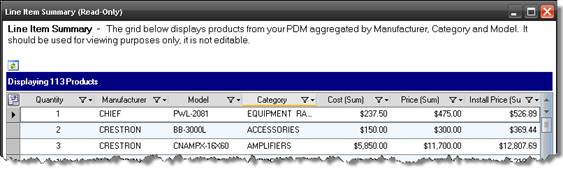
Line Item Summary
Displays an aggregated view of the PDM based on Category Manufacturer, and Model
Flat Grid – displays the products in the PDM without grouping on Packages or Accessories
Package/Accessory Grid - displays the products in the PDM without grouping by Packages or Accessories
Show/Hide All Accessories
Will expand or collapse accessories in the PDM. Products that have accessories have a “+” next to them in the PDM when you choose to group on Packages and Accessories
Expand/Collapse All Rows – expands or collapses all rows in the PDM
 ... Assign
This button allows you to assign Locations, Zones, and Head Ends to Products in the PDM. The default is to assign Locations and Zones, use the drop-down menu to make other selections.
 ...... Print
Prints the PDM
 ...... Export to Excel
Export the contents of the PDM to an Excel spreadsheet. This file can be used for making additional calculations on the Products. This spreadsheet is not importable back into the software through the MMPD interface.
 ...... Update Price
This allows you update the price of multiple Products in the PDM based on Discount, Margin, and Markup.
 ...... Update Case
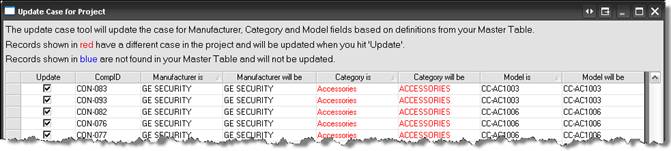
Use this to update the case settings within a project if you have made changes to your default case settings in the MMPD interface. A window will open showing what will be changed. You can uncheck any products you do not wish to change:
 ...... Open in I/O Studio
Opens the I/O Studio for the product that is selected in the PDM. See I/O Studio for more information.
 …… Google Product Search
This will open an IE window to a Google product search for the selected product. The search is based on Manufacturer and Model.
![]() Another way to customize the view of the PDM other than clicking
Another way to customize the view of the PDM other than clicking ![]() is to right-click any Column heading in the PDM. The right-click menu that displays gives you multiple options for customizing the view of the PDM:
is to right-click any Column heading in the PDM. The right-click menu that displays gives you multiple options for customizing the view of the PDM:
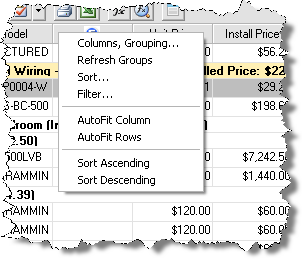
| Command | Description |
| AutoFit Column | Resizes the selected column to the width of the longest string |
| AutoFit Rows | Resizes all rows to the same height |
| Sort Ascending | Sorts the selected column by value: lowest to highest (alternative = left mouse click once in a column heading) |
| Sort Descending | Sorts the selected column by value: highest to lowest (alternative = left mouse click once in a column heading) |
| Expand All | This expands all [+] symbols displayed in the PDM (groupings) |
| Collapse All | This collapse all [+] symbols displayed in the PDM (groupings) |
- © Copyright 2024 D-Tools