Right Click
Table of contents
- Additional Right Click options
- Right-Click->Add->Product/Package/Create New Package
- Right-Click->Edit
- Right-Click->View in Google Product Search
- Right-Click->View Extended Data*
- Right-click->Duplicate
- Right-click->Replace Product
- Right-click->Delete
- Right-click->Assign->Location and Zone/Location/Zone/Head End
- Right-click->Refresh Data from Master Table
- Right-click->Update Data to Master Table
- Right-click->Regenerate Component ID
- Right-click->Web Specs
- Right-click->Open in I/O Studio
- Right-click->Select All/Deselect All
- Right-Click->Expand Row/Collapse Row
Additional Right Click options
Right-Click Options can apply to individual products, multiple selected products and Product Groups. The screenshot below shows the other available options when you right-click a Product or Group Heading that is selected in the PDM.
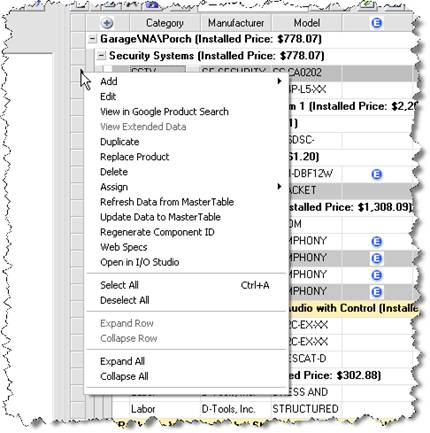
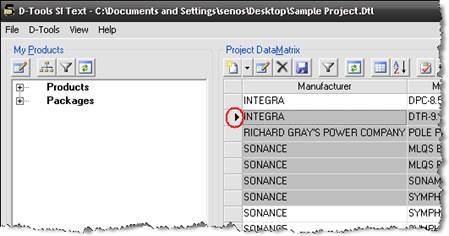
![]() Some of these options will apply across multiple Products, some only for the primary selected Product or Group. Selected Products are indicated by a gray row color, and the primary selected Product is indicated with an arrow in the PDM.
Some of these options will apply across multiple Products, some only for the primary selected Product or Group. Selected Products are indicated by a gray row color, and the primary selected Product is indicated with an arrow in the PDM.
To select multiple items in the PDM, use your [Ctrl] or [Shift] keys.
Right-Click->Add->Product/Package/Create New Package
Choosing "Product" or "Package" will open the appropriate form for adding these objects, see here for more information on adding products/packages. The "Create New Package" function will allow you to create a new package for the selected products in the PDM.
Right-Click->Edit
This works for the primary selected Product or Package in the PDM. This will open a Product or Package Properties form:
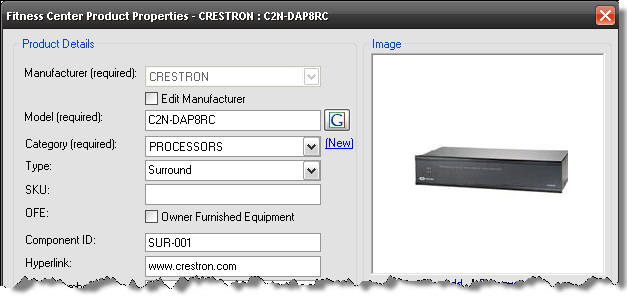
![]() The Edit right-click option is the same as double-clicking a Product or Package in the PDM. You can also select the Product or Package and then click the
The Edit right-click option is the same as double-clicking a Product or Package in the PDM. You can also select the Product or Package and then click the ![]() button at the top of the PDM. Hitting Esc will close this window.
button at the top of the PDM. Hitting Esc will close this window.
Right-Click->View in Google Product Search
This will open up a web browser and display the search results for the product in Google Products. The search is based on Manufacturer and Model.
Right-Click->View Extended Data*
*(Data Subscriptionis required)
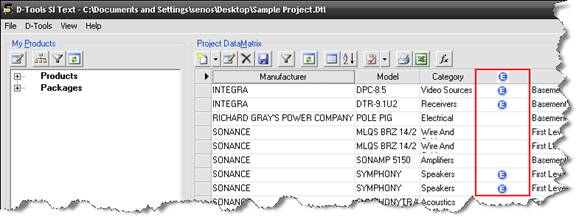
This works for the primary selected Product in the PDM. This will launch a web browser directed to a D-Tools server where Product manuals, brochures, and images can be downloaded, saving you the trouble of having to search manufacturer’s websites for this information. Extended data is part of our Data Subscription program. A product that has extended data displays a ![]() in the Extended Data column within the PDM. You MUST maintain the D-Tools provided Manufacturer, Model and Category settings/spelling to access the Extended Data.
in the Extended Data column within the PDM. You MUST maintain the D-Tools provided Manufacturer, Model and Category settings/spelling to access the Extended Data.
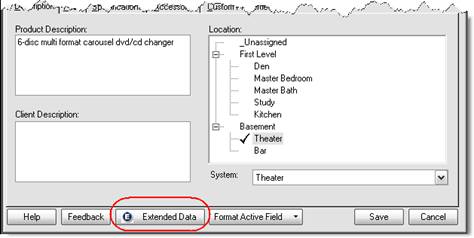
![]() Another way to access Extended Data if available for a given product is through the Product Properties form. At the bottom of the form, there is an [Extended Data] button:
Another way to access Extended Data if available for a given product is through the Product Properties form. At the bottom of the form, there is an [Extended Data] button:
Right-click->Duplicate
This works for Packages and multiple Product selections in the PDM.

Enter the quantity of additional products/packages that you wish to add to the project. Unchecking the "Keep duplicated product(s) and package(s) in same location and zone" option will allow you to duplicate the products to other location(s) and/or zone(s) within the project.
Right-click->Replace Product
This works for the primary selected Product in the PDM. This allows you to change the selected Product to any other Product in your database.

The "Maintain Component ID(s)" option allows you to keep the Component ID the same for the replacement product. See Component ID for more information.
There is also the option "Keep Accessories". This allows you to change the "parent" product within a project but keep the accessories from the original product with the replaced product. For example, if you were replacing an LCD within the project that has a tilt mount and cabling attached as accessories, you might want to keep the mount and cables from the original LCD and have them be associated to the new LCD.
Note: In the Visio and AutoCAD interfaces, there is also a "Maintain Shape(s)" and "Maintain Block(s)" option on this form. This allows you to keep the blocks on the existing sheets for replaced products.
Right-click->Delete
This works for Packages and multiple Product selections in the PDM. This will remove the selected Products or Packages from the Project.
![]() You can also delete Products or Packages by selecting them and clicking the [Delete] key on your keyboard or by clicking the
You can also delete Products or Packages by selecting them and clicking the [Delete] key on your keyboard or by clicking the ![]() button at the top of the PDM.
button at the top of the PDM.
Right-click->Assign->Location and Zone/Location/Zone/Head End
This works for Packages and multiple Product selections in the PDM. You have four assignment options here: “Location and Zone”, “Location”, “Zone”, and “Head End”.
Locations and Zone
Use this command to change the Location and Zone for the selected Products and/or Packages. Generally you would use this option instead of selecting “Location” or “Zone” individually. The Assign Location and Zone form opens:
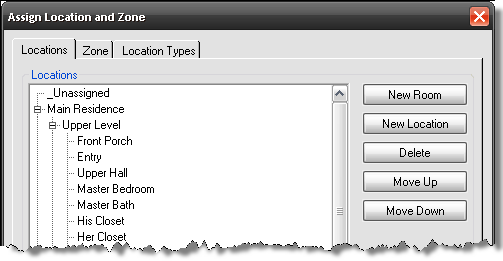
Use the tabs to make your selections.
Head End
The Head End assignment only applies to Wire and Cable, and only to Wire and Cable assigned to a Phase that has the associated Head End action. Confused? Head End is the “start point” of the wire. By default, the “Rough-In” phase is the only SI 5 phase that ships with the Head End action. When a “Rough-In” Wire is added to a Project, the Head End dialog box opens as shown below:
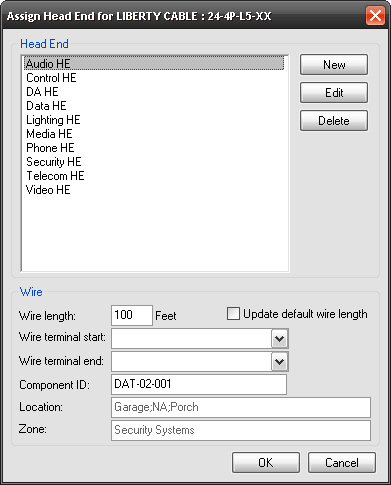
If you ever want to reassign a Head End once the Product is added to the PDM, use this right-click option.
Right-click->Refresh Data from Master Table
This works for multiple Product selections in the PDM. This will refresh the selected Products with data from the Master Table database.
![]() Example: You update the pricing Products for a manufacturer in your Master Table database. However, some of these Products have already been added to Projects that are in process. To update the pricing for all of the Products for that manufacturer, select them in the PDM, right-click->Refresh From Master Table.
Example: You update the pricing Products for a manufacturer in your Master Table database. However, some of these Products have already been added to Projects that are in process. To update the pricing for all of the Products for that manufacturer, select them in the PDM, right-click->Refresh From Master Table.
Use the ![]() button to filter the PDM to easily find the Products you want to refresh.
button to filter the PDM to easily find the Products you want to refresh.

Right-click->Update Data to Master Table
This works for Packages and multiple Product selections in the PDM. This does the exact opposite of the Refresh Data from Master Table command. This takes the selected Product and/or Package data from within the Project and updates the Master Table database. This function is used less often than Refresh Data from Master Table since the following form is presented each time you edit Product data using the Product Properties form:
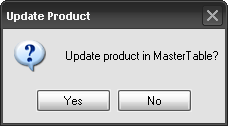
However, if you edit Product data directly in the PDM grid, you will not be asked to update the Master Table. If you wish to update the Master Table, use the Update Data to Master Table function.
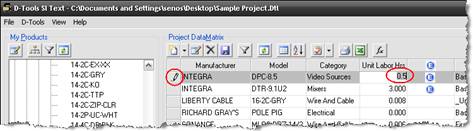
![]() To edit data directly in the PDM grid, left-click once on the field you wish to edit. The pencil icon on the left indicates that you are editing the product, and the field you selected will have focus allowing you to edit. If you intend to replace the data in the field, press F2 to select and highlight the contents. Your first keystroke will delete the field’s contents and insert the typed character.
To edit data directly in the PDM grid, left-click once on the field you wish to edit. The pencil icon on the left indicates that you are editing the product, and the field you selected will have focus allowing you to edit. If you intend to replace the data in the field, press F2 to select and highlight the contents. Your first keystroke will delete the field’s contents and insert the typed character.
Some fields have dropdown menus:

Right-click->Regenerate Component ID
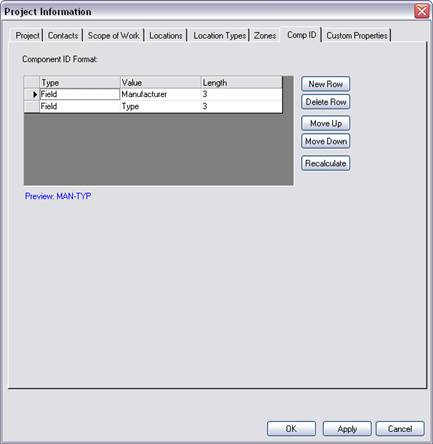
This works for multiple Product selections in the PDM. It will recalculate the Component ID for ONLY the selected Products in the PDM based on the Component ID format for the Project. To modify the Component ID format within a Project, select D-Tools->Project Information and then click the Component ID tab.
The [Recalculate] button will recalculate the Component ID for ALL Products in the PDM. If you only want to recalculate specific Products, use the right-click option instead of using the [Recalculate] button on this form.
![]() If wire labels have already been installed that reference the Component ID, care should be taken before deciding to recalculate the IDs.
If wire labels have already been installed that reference the Component ID, care should be taken before deciding to recalculate the IDs.
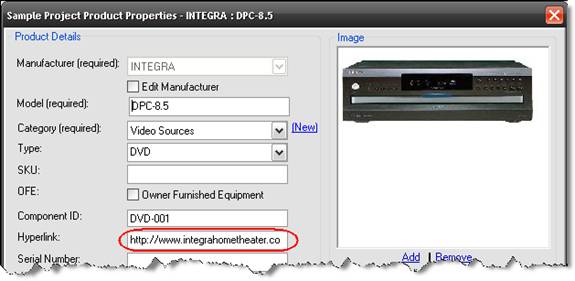
Right-click->Web Specs
This works for the primary selected Product in the PDM. This will launch a web browser directed to the URL in the “Hyperlink” field for the Product:
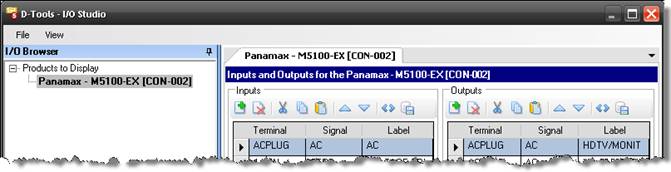
Right-click->Open in I/O Studio
This opens the I/O Studio for the product that is selected in the PDM. See the MMPD section of this guide for specs on the I/O Studio.
Right-click->Select All/Deselect All
These options will either select all of the Packages and/or Products in the PDM, or deselect them all.
Right-Click->Expand Row/Collapse Row
This will work for Group headers or multiple row selections in the PDM. This option works in conjunction with grouping. When you group Products in the PDM, [+] and [-] options display in the PDM for each Grouping ([+] = Expand row, [-] = Collapse row). You can use this right-click command to Expand or Collapse the selected rows in the PDM.

- © Copyright 2024 D-Tools