Product Price
Product Price Tab
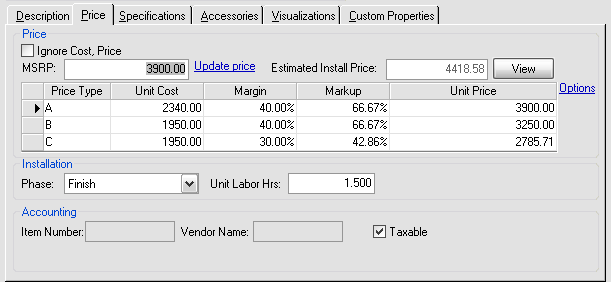
There are three sections under the Price tab: Price, Installation, and Accounting.
Price
MSRP
Manufacturer Suggested Retail Price - this is for reference only and can be used as the basis for Unit Cost and Unit Price calculations. It does not appear in reports nor does it get used in project pricing calculations.
Price Type
You can have up to three pricing levels for each Product. The names of these fields default to A, B, and C, but can be changed under the Setup tab in the Navigator, see Application Settings.
Unit Cost
What one unit of the Product costs you.
Unit Price
The price you charge for one unit of this Product.
Margin
Profit represented as a percentage of Unit Price (preferred).
Markup
Profit represented as a percentage of Unit Cost.
There are two handy formulas to use for markup and margin. Remember to convert percentages to decimals for the following calculations.
Unit Price = Unit Cost / (1 - Margin)
Margin = (Unit Price-Unit Cost)/Unit Price
Unit Price = Unit Cost * (1 + Markup)
Markup= (Unit Price-Unit Cost)/Unit Cost
Example: Unit Cost is 1700 and you add a 40% markup to your products. Your Unit Price will be 1700 * (1 + .40) = 2380.
A 40% margin for the same product would yield a Unit Price of 1700/(1-.40) = 2833.33.
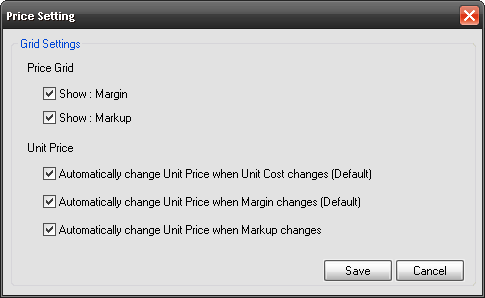
Options link will open the following form and allow you to change the view and pricing methodology:
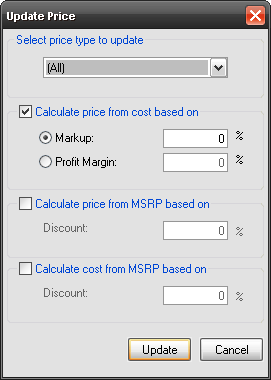
Update Price link will open the following form allowing you to determine Product pricing in various ways.
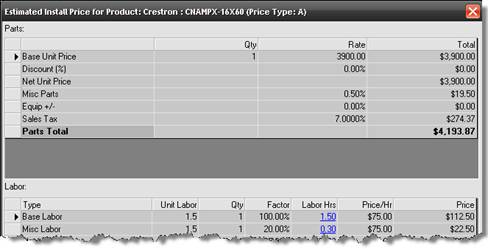
Estimated Install Price: This shows you what the estimated install price for the product is based on your default Phase and tax settings from the Setup tab. Click the [View] button to see the detail:
Installation

Phase
This dropdown allows you to choose the Phase when the Product is being installed. Labor rates are Phase specific.
Unit Labor Hours
Number of labor hours associated with the Product. This number is multiplied by the labor rate set for the Phase.
Labor is calculated for each Product in a Project based on the Phase rates and the Unit Labor Hours assigned to the Product. You also have the option of creating Labor Products (also called Labor Items or Labor Line Items) to add labor to a project. See Labor Products.
Accounting
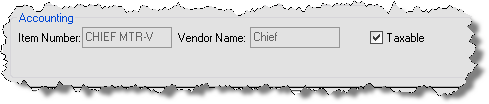
Item Number
This field holds the item number of the corresponding Product from your QuickBooks database. This value is generated by the QuickLinks interface.
Vendor Name
This field is for the default vendor associated with the corresponding QuickBooks Item and is established through the QuickLinks interface.
![]() These fields should only be edited/set from within the accounting software interface such as QuickLinks (optional product), or by importing from a CSV file via the Import tab. Modifying these fields is not recommended for non-administrators. See QuickLinks or more details.
These fields should only be edited/set from within the accounting software interface such as QuickLinks (optional product), or by importing from a CSV file via the Import tab. Modifying these fields is not recommended for non-administrators. See QuickLinks or more details.
Taxable
Choose whether or not the item is taxable. See Taxes for details.
If you set your Tax Code to Canadian under your International Options, you will have dropdowns for assigning Purchase Tax Code, Sales Tax, and Labor Sales Tax rather than the “Taxable” checkbox.

- © Copyright 2024 D-Tools