QuickBooks Item Number Tips
Table of contents
Background
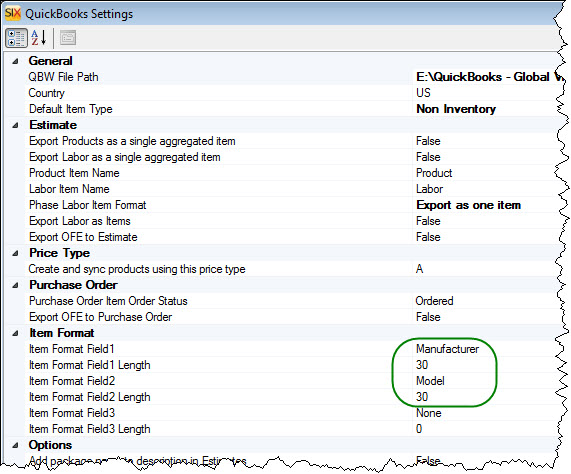
In SIX, you can choose the format for the QuickBooks Items that will be created via the QuickBooks interface. You can have up to three "levels" in your hierarchy, and you can choose between four fields of data: Manufacturer, Model, Category, Part Number. The default format in your QuickBooks Settings is to use 30 characters of the Manufacturer name followed by (subitem of) 30 characters of the Model Number:
In QuickBooks, the Item number will display one of two ways, depending on your settings.
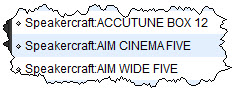
Flat view (a colon indicates that that Model Number is a subitem of the Manufacturer):
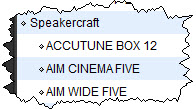
Hierarchical view (the Model Numbers are tabbed in to indicate that they are subitems of the Manufacturer) :
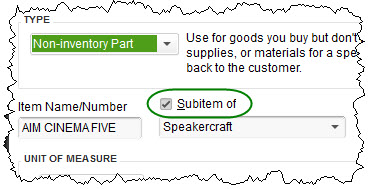
This is just an Item in QuickBooks open for edit showing the "Subitem of" field:
This default is used by many users because it clearly identifies the item.
Tip 1
There is an issue with the way QuickBooks handles printing Items that have subitems, and that issue is that the "parent" item does not print, thus defeating the use of both Manufacturer and Model for you Item Number.
Example below shows a Purchase Order in QuickBooks as it displays in QuickBooks. Notice that it displays as you would expect, i.e. the entire Item Number is displayed:
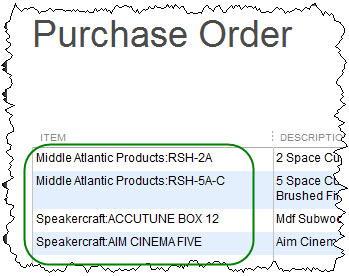
But when you actually print the PO, either physically or you save to PDF, the Manufacturer name is dropped:
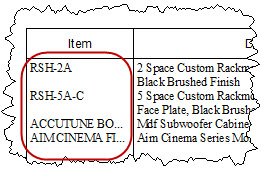
This can certainly cause issues when you are attempting to order your products from a distributor vs. from the Manufacturer directly.
While we at D-Tools can't change the way QuickBooks works, we can offer a work around to the above issue.
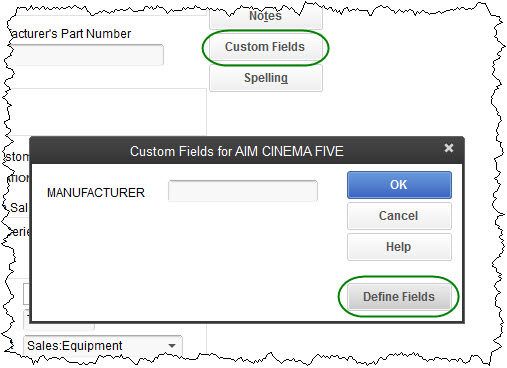
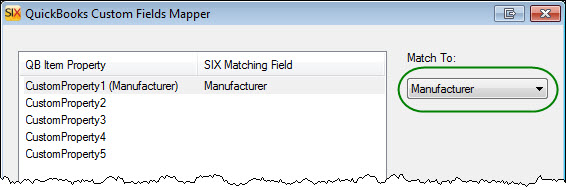
In QuickBooks, identify one of your Custom Fields as "Manufacturer":
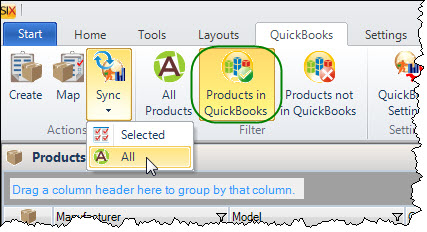
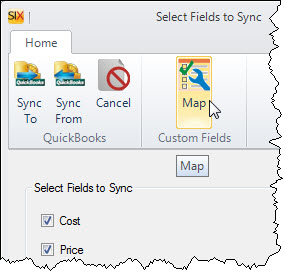
In SIX, open the Product Explorer and click the QuickBooks tab. Click the [Products in QuickBooks] filter then click Sync->All:
On the form that opens, click the [Map] button:
Use the drop down menu to select "Manufacturer" for the "Match To" Field and click [Save]:
Now uncheck all fields except the Custom Field and click the [Sync To] button:

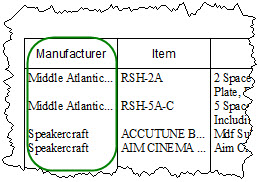
Over in QuickBooks, you will need to then create a custom template for your Purchase Orders that includes this Manufacturer Custom Field. Note: look up instructions on how to do this for you particular version/flavor of QuickBooks. Below is an example of a printed Purchase Order using this new Custom Field:
Tip 2
When using the "subitem of" format for your QuickBooks Item Number, you must adhere to the rules of QuickBooks. Namely, when using this format, all Items must be of the same Type, either Inventory, Non-Inventory, or Service. This can cause some headaches when you use your own company name as the Manufacturer for both Products and Labor Items since the Products will either be Inventory or Non-Inventory while the Labor Items would be a Service. If you have already created, say a Labor Item over in QuickBooks, when you attempt to add a Product you will get an error as shown below:

The item 'X:Y' has a parent item 'X' of a different item type. Parent and child types must be of same type.
There is no way to skirt this rule in QuickBooks when using subitems so we recommend using a slightly different Manufacturer name for your Labor Items than you do for your Products. In this example, use "Global Vision Ltd" for your Labor Items and something like "Global Vision Ltd Parts" or "GVL" for your Products.
- © Copyright 2024 D-Tools