D-Tools PDF Cloud Converter

History
Getting a CAD floor plan into Visio traditionally has been a difficult experience. Up until we created this process as outlined below, the only way to get a high quality result was to import a properly formatted and correct version DWG file. Just getting a properly formatted DWG can prove to be a challenge and in a lot of cases a copy of AutoCAD would be needed just to edit the DWG before insert into Visio. That is assuming you can get the DWG from the architect in the first place. These days PDF, not DWG seems to be the preferred distribution method for CAD files.
On the other hand, Visio has always had an insert PDF function that would allow the user to easily import a PDF that was generated from the CAD file into the background with the dual caveats that the import would be not be to scale and that the nice clean vectors in the PDF would be converted to somewhat jagged bitmaps during the conversion process. This created a CAD background that was not to scale, looked bad on-screen, and looked even worse when it was printed to paper or PDF.
What we wanted to develop was a process that would allow the user to completely bypass the DWG part and allow the user to easily import a PDF file created from CAD directly into Visio while maintaining the drawing scale and the high quality vectors of the original DWG file. We also wanted a high quality output when printed or saved as a PDF.
Video
Details
Pricing
This function uses a third-party conversion tool. Our conversion vendor charges by a per page converted pricing structure and we will have to do the same. However, we plan on giving all of our customers who are on the current version of SI 50 pages for free and then introduce a pricing model where you will be able to purchase conversions in blocks of 50 pages.
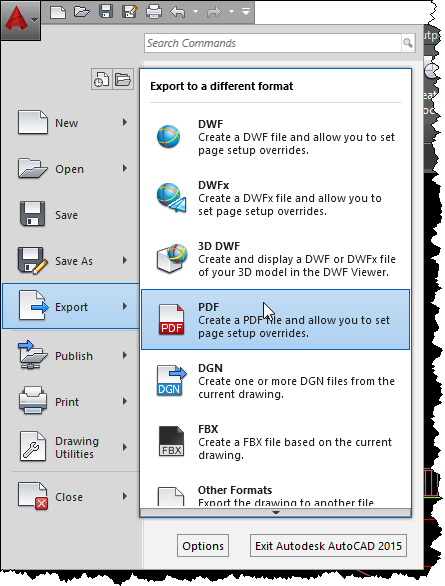
Insert a scaled PDF File
- Open the PDF file that you want to insert into Visio in Adobe Acrobat Reader. In order to work properly, the PDF file should be created directly from the originating CAD program, e.g. Export->PDF within AutoCAD.
Note: The converter will not convert bitmapped drawings or scanned files.
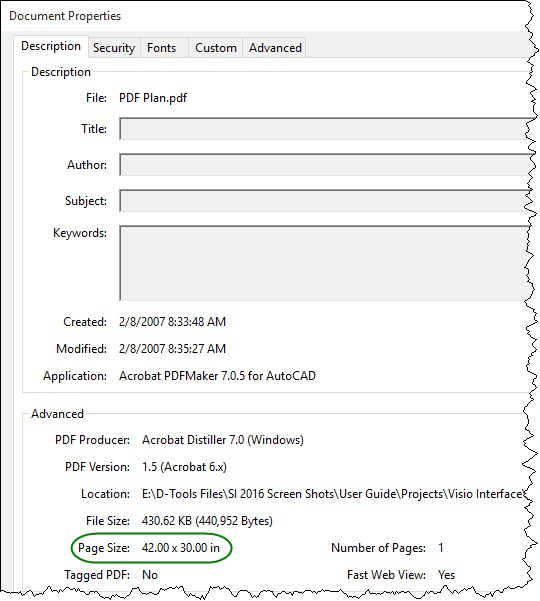
- In Adobe Acrobat Reader, go to File->Properties and you should see a page size under the Advanced section of the Description tab. Make a note of the page size. This is important if you want to maintain scale in the inserted PDF file. If you do not care about the PDF being to scale then you can skip to this section.
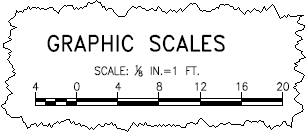
- Take a look at the drawing and try and find the scale in which it was saved. This is usually located in the lower right of the drawing. In this example the scale is 1/8 IN. = 1 FT.
- Create a new Visio drawing in SI based on a project as normal and choose the template size as needed for this project. In this case I am using 42 X 30-inch template to match the PDF page size.

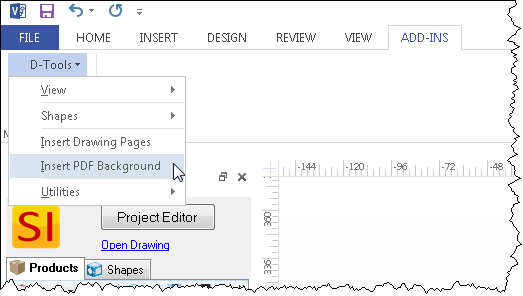
- In Visio go to the Add-Ins tab and choose D-Tools->Insert PDF Background:
A set of instructions will display. Click the "Do not show me again" once you've memorized them. There will be a quiz.
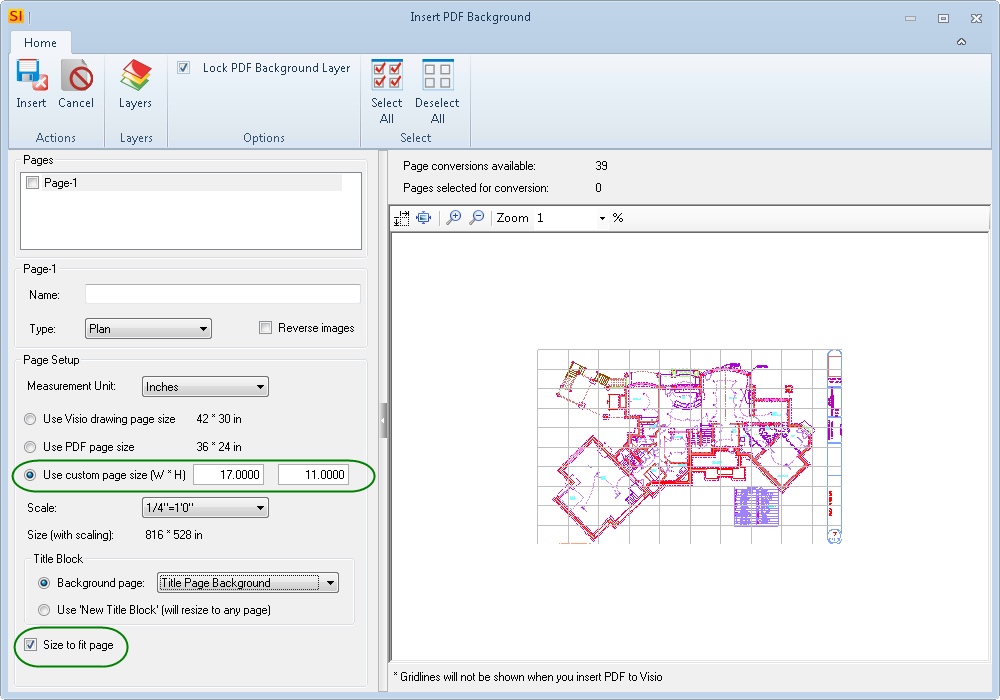
- Navigate to the file you want to insert. After the file is uploaded to our cloud server you will be taken to an Insert PDF Background form. This form will allow you to preview the page or pages in the PDF file as well as manipulate some of the options. In this case there is only one page.
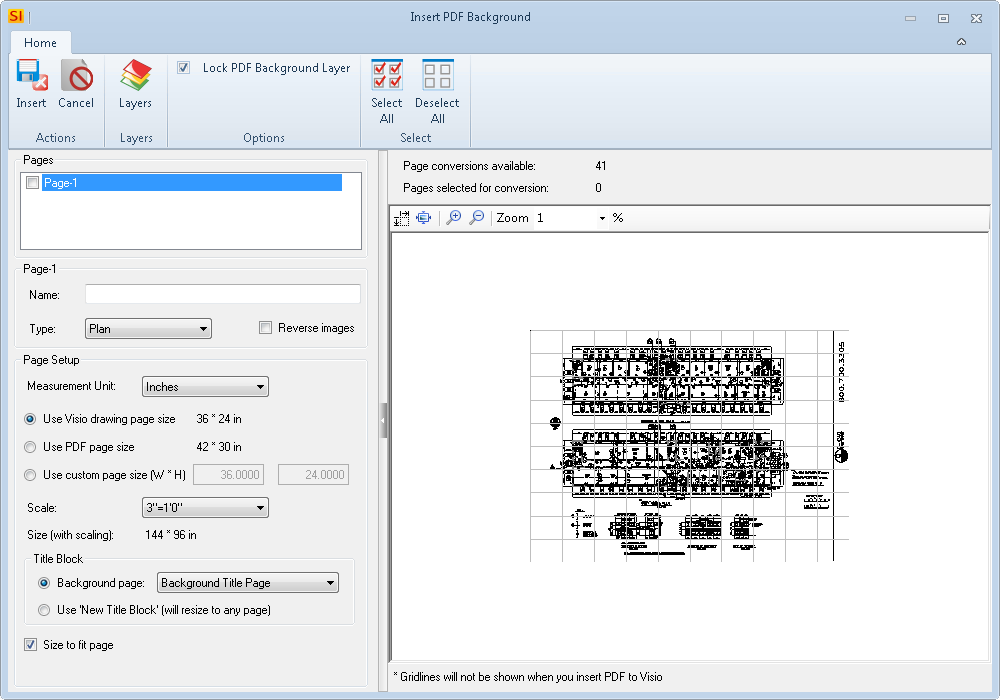
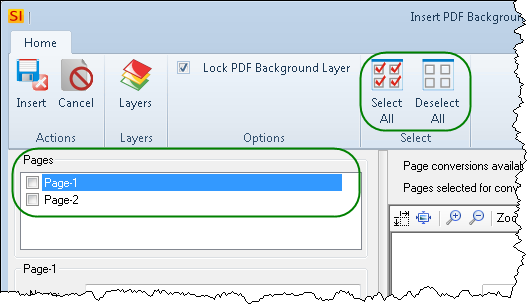
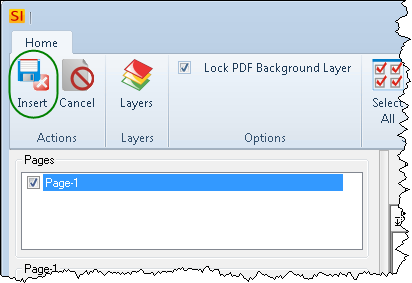
You will still need to check the box next to the page even if there is only one page. If there are multiple pages, select the page(s) you want to insert by clicking the check box in the Pages section of the form. You can also use the [Select All]/[Deselect All] buttons:
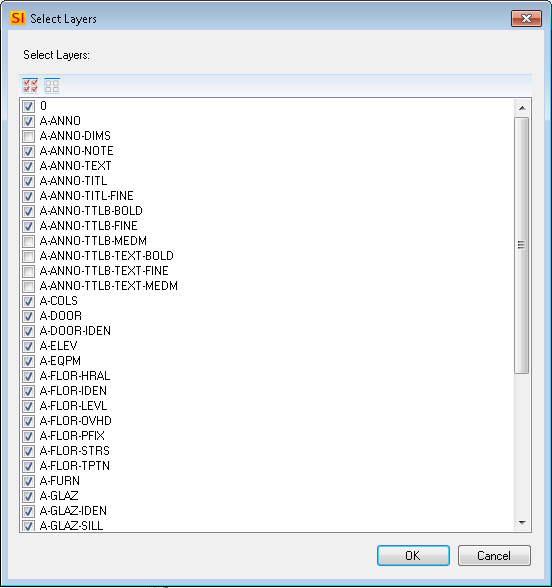
- If the PDF has layers you can also edit the specific layers in each page by selecting the page you want to edit and then clicking the [Layers] button.

This will bring up a new form that lists all the layers on that page.
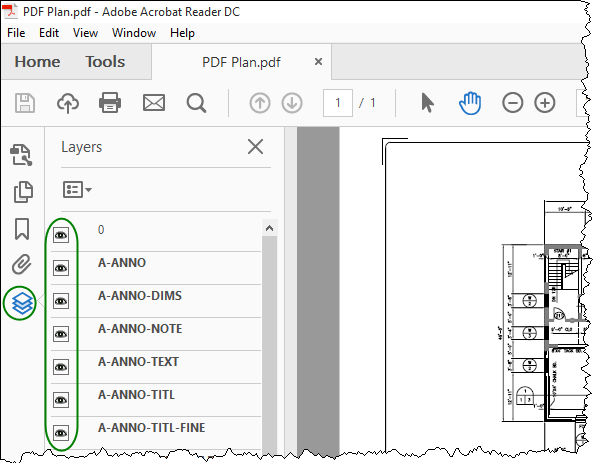
To determine which layers are which, open the original PDF file in Adobe Acrobat Reader and click the Layers button along the left side. Then click the "eyeball" icons next to each layer to turn them off. Toggle layers on and off until you get the desired results.
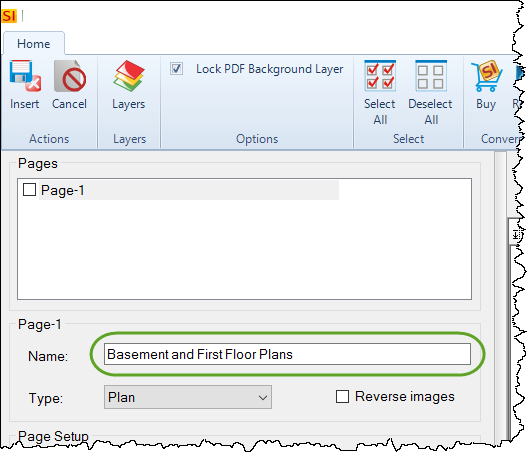
- Give the page a descriptive name if desired and select the Type. This will be the new Visio page name and the Type will determine what style of Visio shapes will be used on the page. Generally this will be "Plan" as most PDF insertions will be floor plans.
- Choose the Measurement Units. In this case it is in inches.
- Choose the Width and Height of the page. This will default to the size of the Visio page but if you wish to change this you can.
- Choose the scale of the drawing from Step 2 from above. In this example it is 1/8 IN = 1 FT.
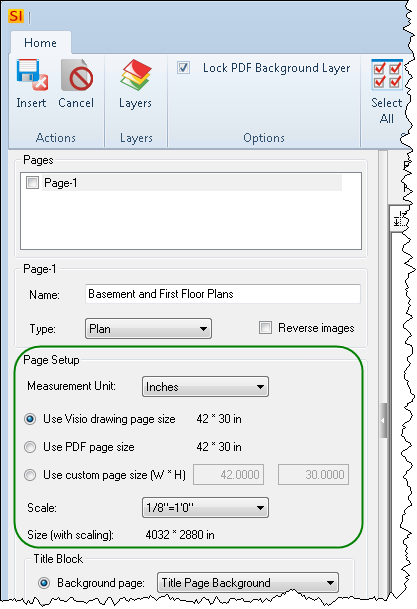
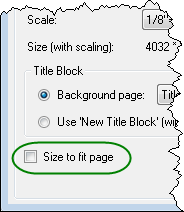
- If you want to maintain scale in the drawing, make sure that the "Size to fit page" checkbox is not checked. If scale is not important then you can leave this option checked. In this example the box is unchecked because we are trying to maintain the 1/8 IN = 1 FT scale.
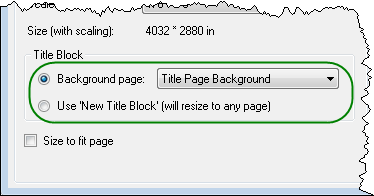
- Choose which background page (if any) you want to have in the background. Generally you will just leave this as the default "Title Page Background" in the "Background page" option. In some cases, the drawing page may be a different size than the background page for the Visio template selected in Step 4. Since background and foreground pages must be the same size, choose the "Use 'New Title Block'" option.
- If you notice that any images are reversed (rare) on any of the pages in the PDF file check the reverse image on page to normalize.
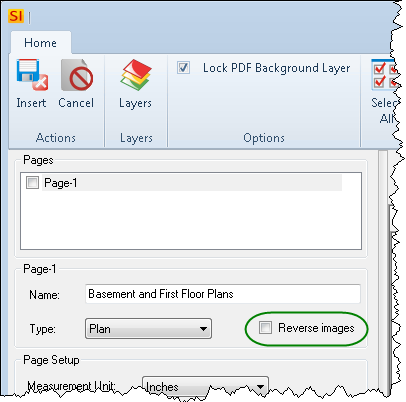
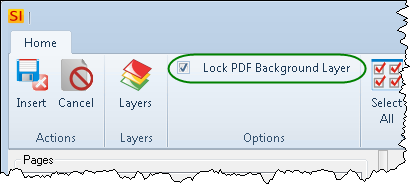
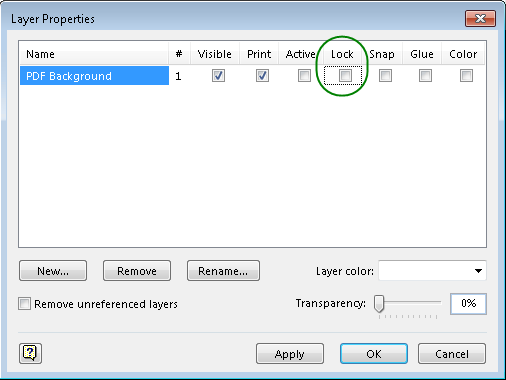
- The default option will be to "Lock PDF Background Layer". If you do not want to automatically lock the layer, uncheck this box. You can always lock the lock/unlock this layer once inserted into Visio.
- Click the [Insert] button to insert the PDF file into Visio:
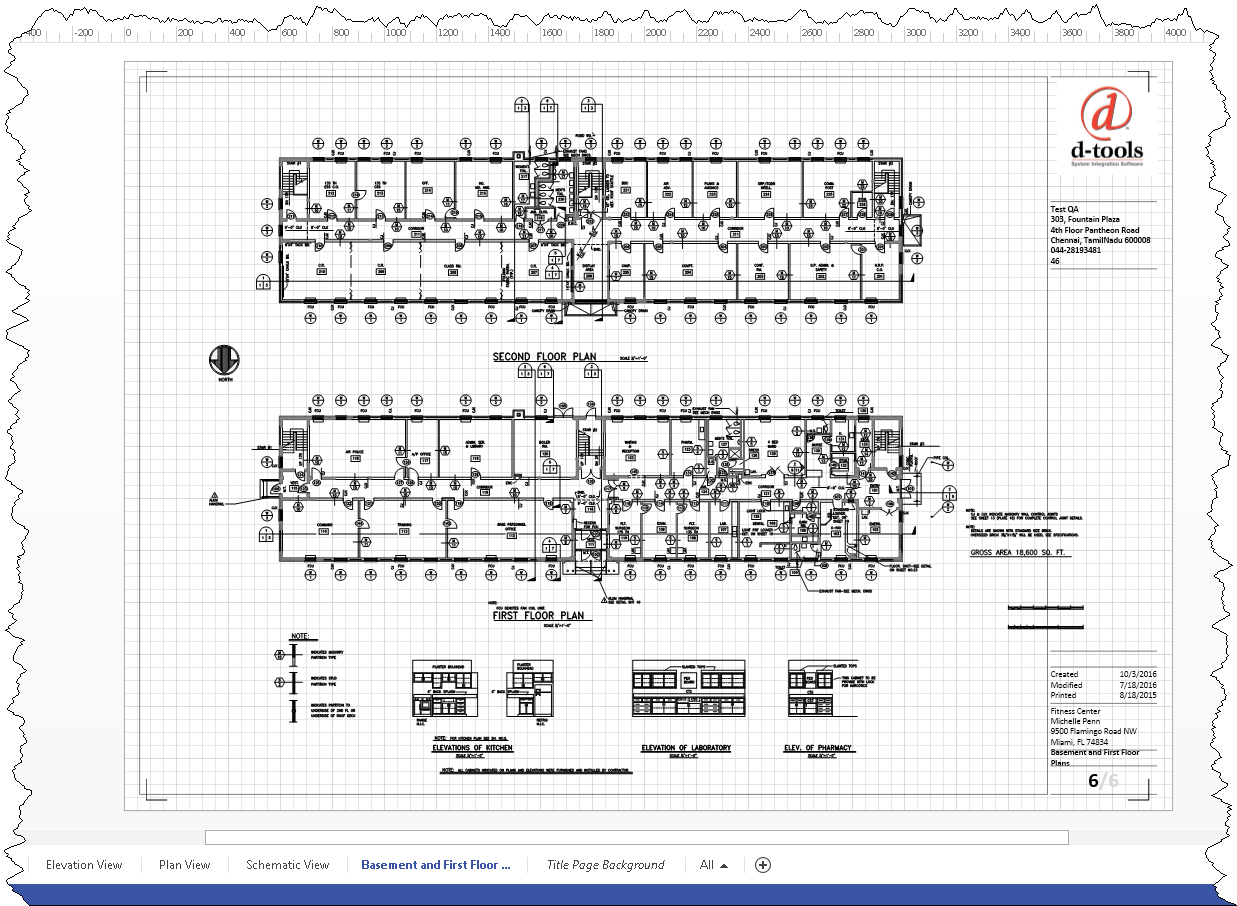
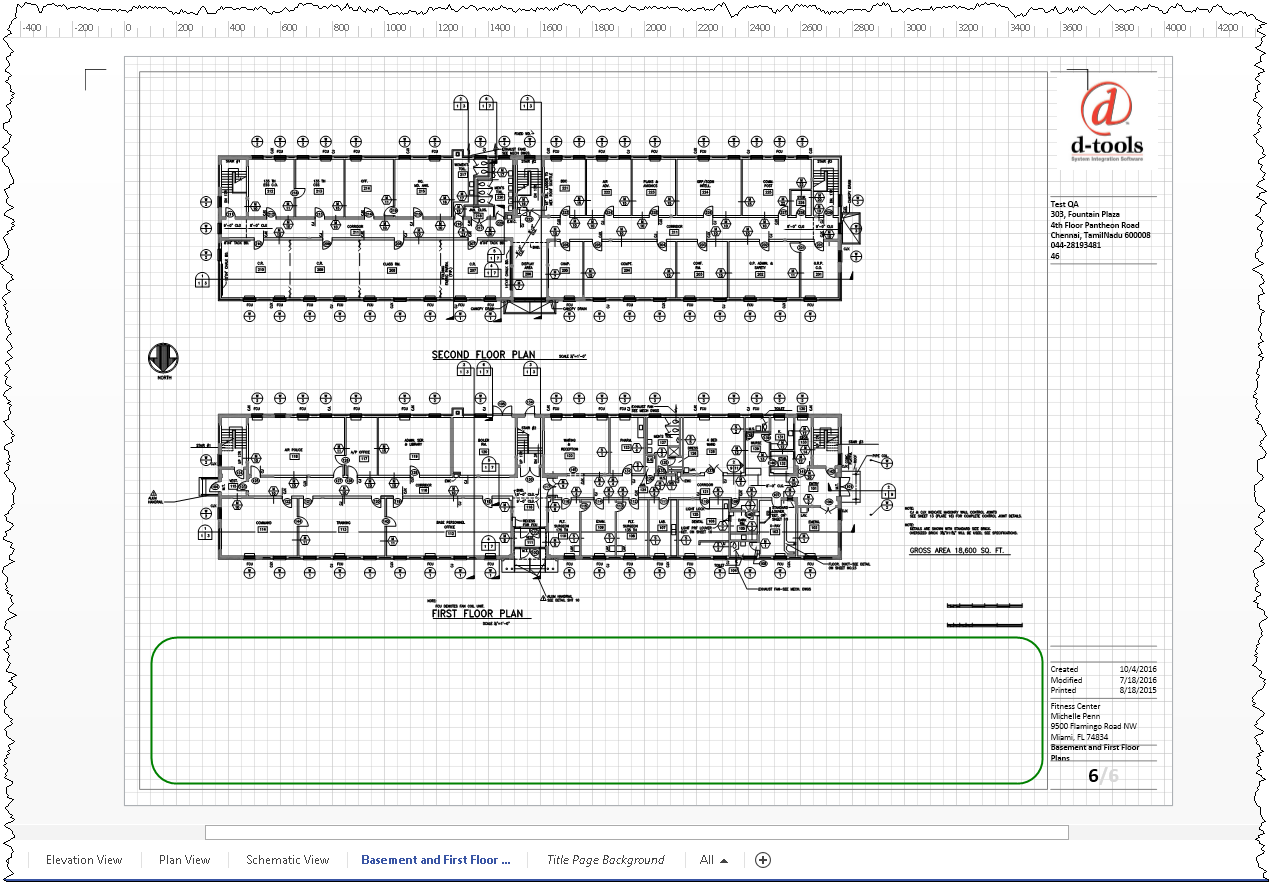
The PDF will be inserted into your Visio file. Example shown below:
Editing the PDF in Visio
Once the file is in Visio you may need to adjust and crop the image as needed. In this example I want to move it over to the left a bit, edit out the previous title block and lock it down once I have finished the edits so that I can lay additional Visio shapes on top without it moving around.
Note: If you chose to "Lock PDF Background Layer" in step 15 above, you will need to unlock the layer before you can edit it.
- From the home tab in Visio, select Layers->Layer Properties:
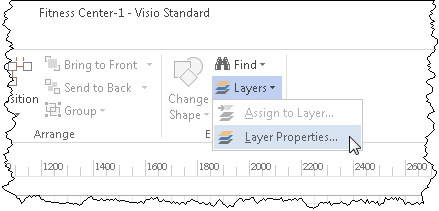
- Uncheck the box in the "Lock" column for the PDF Background layer: Make sure that the Snap and Glue checkbox remain unchecked. If either of these boxes are checked certain Visio shapes will not drop correctly.
- Move the PDF image by selecting it and dragging it to the desired location.
- Crop the file by clicking anywhere on the inserted PDF image and then click the Format tab within Visio and select the Crop Tool.
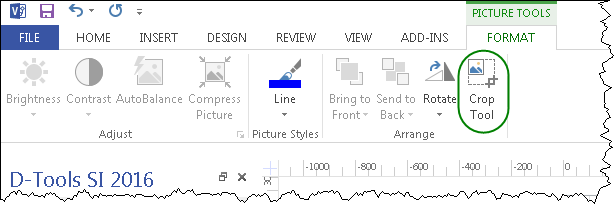
- The inserted image will blur a bit and you will see handles around the image that you can drag to crop the image.
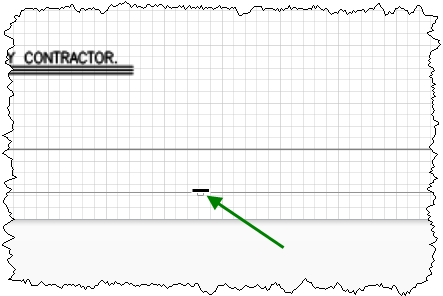
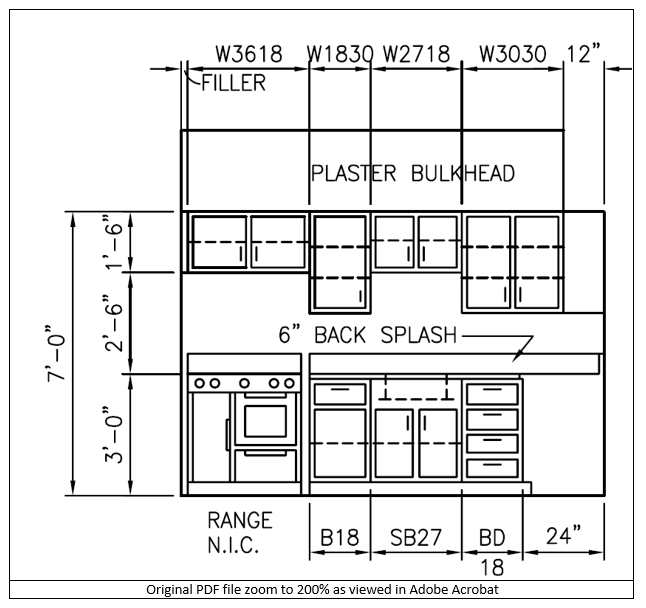
- Click outside the image to show the results of the crop. You should have something like below. In this example I removed the Notes at the bottom of the image.
- When done editing the PDF image, lock or re-lock the layer by opening the Layer Properties as in Step 1 above and then checking the "Lock" column for the PDF Background layer.
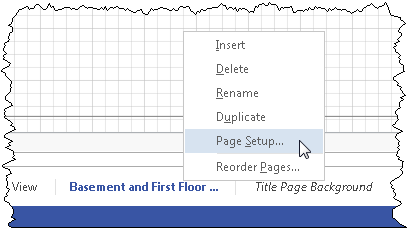
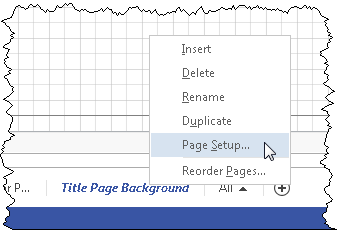
- Right click on the page tab at the bottom of the Visio screen and select Page Setup option.
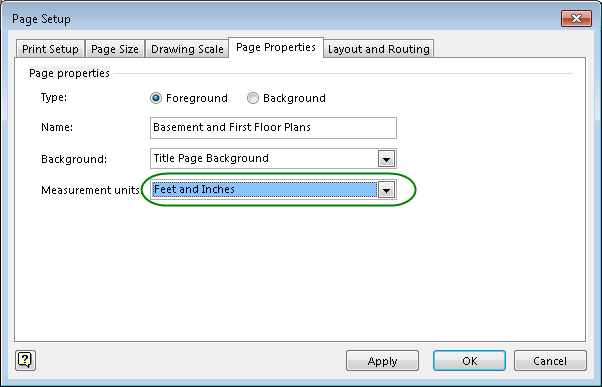
- Change the Measurement Units from "Inches (decimal)" to "Feet and Inches" if on a Plan style page or to "Inches" if you are an Elevation style page.
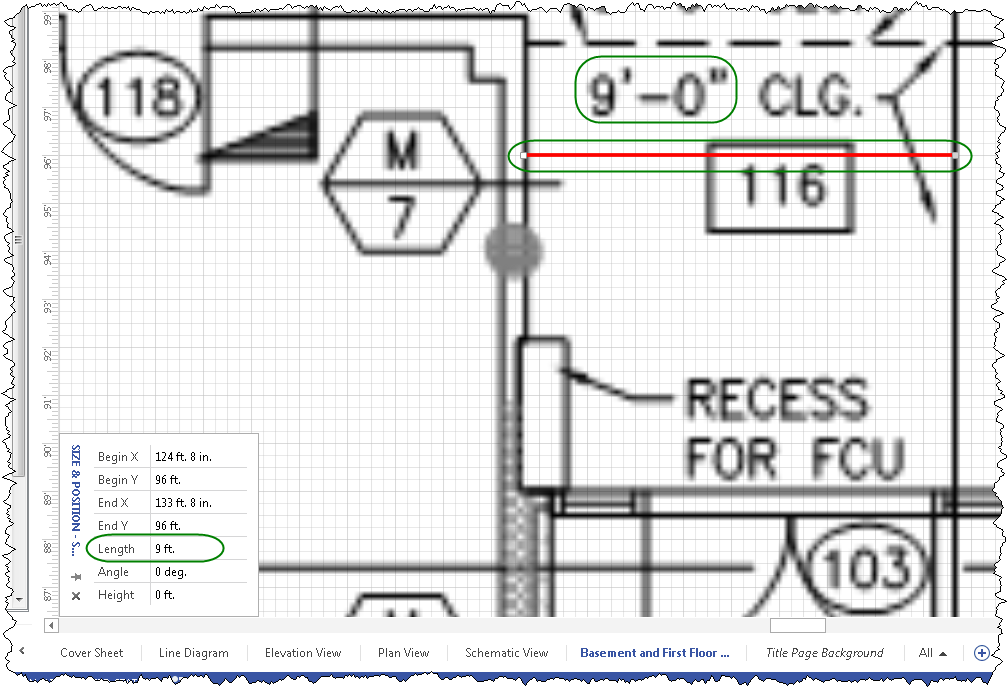
- Check the scale in the image by zooming into a section that has a written measurement and then compare with Visio by drawing a line between two known points and check the length of the line with the "Size and Position" Task Pane. If everything was done according to these instructions, you should have a perfectly scaled PDF insert in Visio.
Insert a PDF Not to Scale
In the example above I used a PDF file that was printed (plotted) at 1/8” to 1’ scale at a 42X30 inch page size. In some cases actual scale may not be important or you may need to print the 42X30 page on a single page of smaller paper.
If you don't know what page size you have in Visio, right-click the "Title Page Background" page tab and select Page Setup.
Then click the Page Size tab:
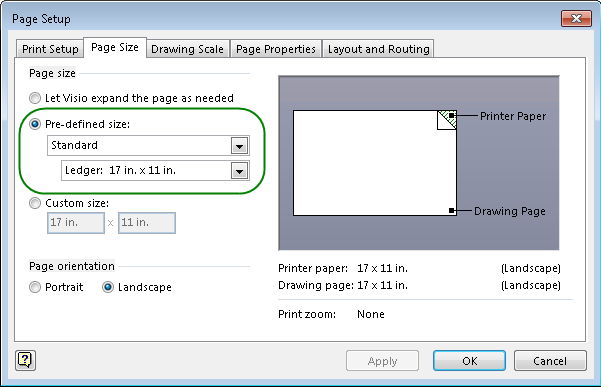
When inserting the PDF Background, you can choose the "Use custom page size (W*H)" radio button and fill in the dimensions of your page size. Also leave the "Size to fit page" option checked.
PDF Fidelity in Visio
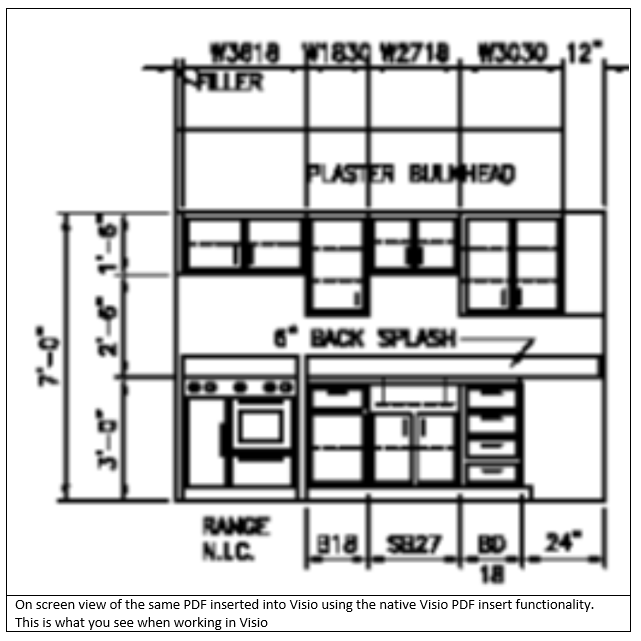
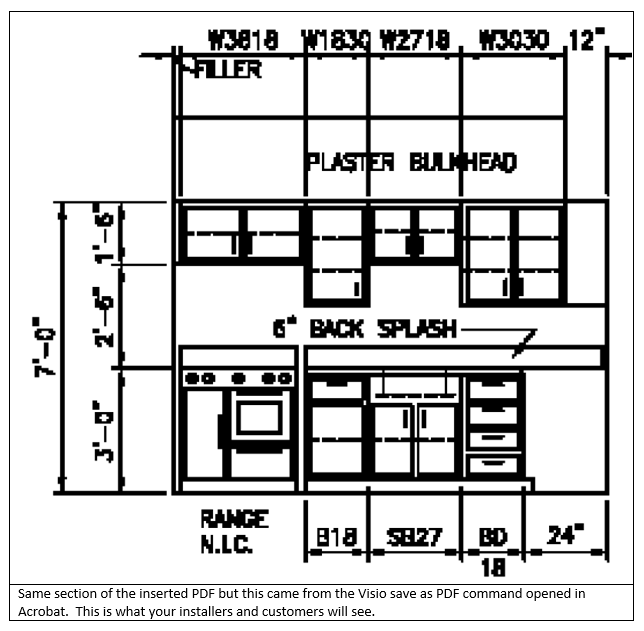
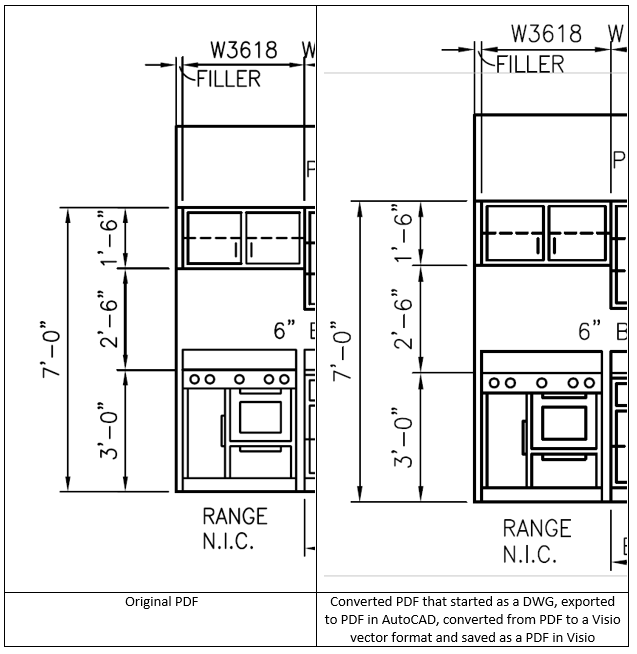
As previously mentioned using the native Visio import PDF functionality would result in a somewhat low resolution bit mapped file on screen and a lower resolution file when saved as a PDF. As you can see from the images below both the onscreen and printed versions are borderline unacceptable. See the use cases below to get an idea of the fidelity of the different processes
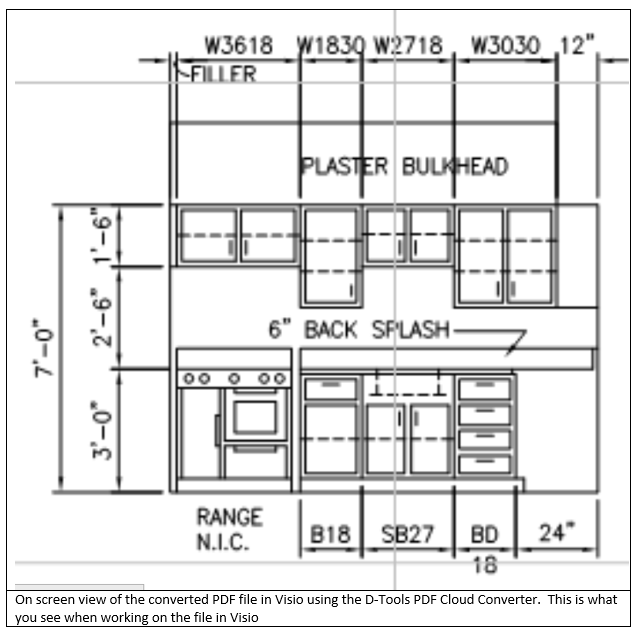
We can now easily compare and contrast what the exact same PDF file looks like when inserted into Visio using the D-Tools PDF Cloud Converter tool and what that file looks like when printed using the Visio Save as PDF command.
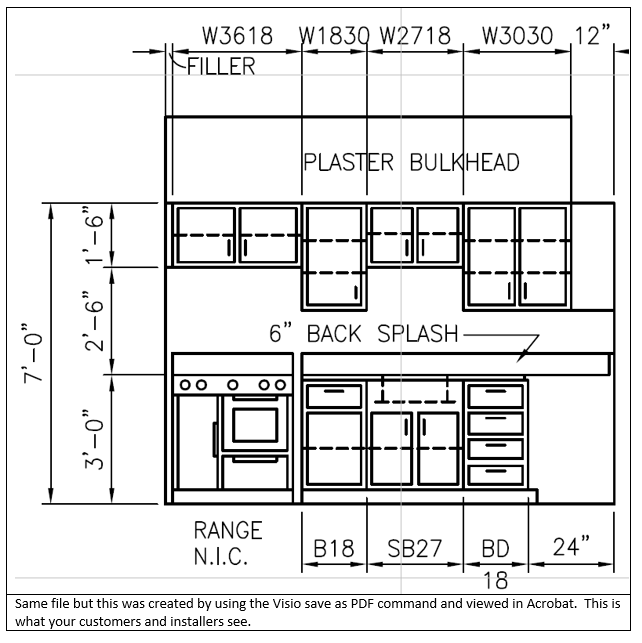
Below is a side by side comparison of original PDF and the same PDF run through our cloud converter, inserted into Visio and then saved as a PDF using the native Visio Save as PDF command.
- © Copyright 2024 D-Tools