Title Blocks 103
Table of contents
Title Blocks 103: Let’s Make a Multi-field SmartShape!
 In our last article on Visio title blocks, Title Blocks #1: How to Display Existing Document Information, we were introduced to a remarkable title block shape.This single shape could display any of four different date-related bits of info: when the doc was created, edited, printed, or the current date/time.
The user simply had to choose which field to display from a drop-down list in the Shape Data Window, and Visio automatically took care of updating the values in the shape’s text.
If you need to create lots of different title blocks for different projects, then a shape like this can save you a lot of work.
And if you’re extremely curious, a power user, or a technical type, then you’ll be interested in how to build shapes like these of your own, and customize them to your own specific needs.
Today’s article will do just that. It’s fairly advanced and detailed, but if that’s what you’re looking for, then come along with us as we rip it apart, and see what it takes to build one of these “Multi-field Visio SmartShapes”.
Multi-field Shape Review
To refresh your memory, let’s have a quick look at how the multi-field shape works. A single shape has a field name and a field value that is date/time-related.
The field name is shown in the left text, the value on the right.
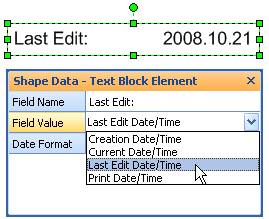
The user can enter any text for the Field Name, select from a list of four different date/time related info items.
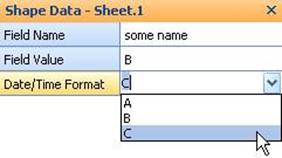
You can see that there are three Shape Data fields:
- Field Name
- Field Value
- Date Format
Field Name is what you want to call the data, and this shows up on the left-hand side of the shape. “Last Edit” is shown in our example above.
Field Value is the data that you want to display, in this case, we’ve chosen to show Last Edit Date/Time.
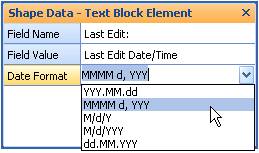
Because different cultures format dates differently, and different companies have different standards, we’ve also included a drop-down list for date formats. You can see it more clearly below:
That’s a pretty useful shape. and you can see how easy it is to quickly create a unit within a title block that shows various date/time info:
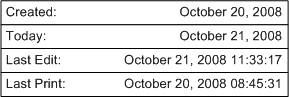
These four blocks all stem from the same shape!
Building the Multi-field Shape
So let’s get to work putting one of these shapes together. The first thing you need to do is simply draw a rectangle, on a blank page in a new Visio document.
Create Shape Data Placeholders
With the rectangle selected, go to the menu: Data > Shape Data. Since the shape has no data fields, Visio will ask you if you want to create some:
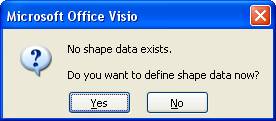
Once you click “Yes”, you’ll be presented with the Define Shape Data dialog:

We’re going to rough-out three fields using this dialog box, then polish them off in the ShapeSheet later on.
Using the dialog shown above, add three fields. To do this, just set the Label, Type and Format fields to the values show in the table below, then click New. After Field #3, click OK instead of New.
| Field #1 | |
| Label | Field Name |
| Type | String |
| Format | blank |
| Field #2 | |
| Label | Field Value |
| Type | Fixed List |
| Format | A;B;C |
| Field #3 | |
| Label | Date/Time Format |
| Type | Variable List |
| Format | A;B;C |
The “A;B;C” bits are placeholders for the choices that we will offer in the drop-down lists. We’ll specify these more fully using the ShapeSheet in just a bit.
Once the Define dialog is gone, you can test your shape by using the Shape Data window. If it’s not showing, you can bring it up via: View > Shape Data. You should see something like this:
We will link the text of the shape to these fields in just a bit, but first, we need to do some behind-the-scenes work…
Add Intelligence to the Fields
So let’s jump into the ShapeSheet and add some smartness to this shape. To view the ShapeSheet, just go to Window > Show ShapeSheet. You’ll see a rather spreadsheet-like interface that can seem a bit frightening at first, but we’ll only be changing a few of the cells, and ignoring the rest, so don’t worry!
Rename the Shape Data Rows
The Shape Data fields that we created earlier using the Define Shape Data dialog are also accessible in the ShapeSheet. In fact, we could have defined all three of the fields in the ShapeSheet, but I thought you’d appreciate the friendliness of the dialog.
You should be able to scroll down in the ShapeSheet and find the Shape Data section. If you don’t see it, be sure to go to View > Sections, and check Shape Data.
The first thing we want to do is rename the shape data fields. They currently have non-friendly names, like “Row_1″. Let’s make the row names more closely match the labels, like this:
Prop.Row_1 –> Prop.fieldName
Prop.Row_2 –> Prop.fieldValue
Prop.Row_3 –> Prop.dateFormat
Just put your mouse in the row-name cell and type in the new value, without the “Prop.”. When you’re done, your Shape Data section should look more like this:

Set the Formats for the Shape Data
Now we need to replace the A;B;Cs in our Format cells with something that makes a bit more sense. For the field values, we’ll give nice English names to the date/time info that we will be offering.
For the Date formats, we’ll offer a selection of valid “formatting pictures”. I won’t go into exactly how these work, but you might have seen something similar if you’ve ever messed with Excel’s Format function.
Copy the formulas below into the corresponding Label column for each Shape Data ShapeSheet cell. (You only need the bits on the right side of the equals sign)
Prop.fieldValue.Format = “Creation Date/Time;Current Date/Time;Last Edit Date/Time;Print Date/Time”
Prop.dateFormat.Format = “YYY.MM.dd;MMMM d, YYY;M/d/Y;M/d/YYY;dd.MM.YYY”
Note: you do need the quote marks, but you might get the fancy 66 99 quotes when you copy, which could cause an error. If this happens, just manually enter normal quotation marks at the beginning and end of the lists.
Back in the Shape Data window, you should now see that the A;B;C lists have been replaced with something that looks a bit more like the shape we introduced at the beginning of this article.
Add a User-defined Cells Section for Scratch Calculations
Before we link our Shape Data to the text in the shape, we need to perform some intermediate calculations. The end-user doesn’t need to see this, so we can add what are called “User-defined cells” to hold our scratch formulas.
While still in the ShapeSheet, just go to the View > Insert Section, and choose User-defined cells.
You should see the User section magically appear, with one row: User.Row_1. We’ll need two user-cells, so right click in one of the cells, and choose Insert Row from the context menu.
The user cells have crummy names, just like the Shape Data rows used to, so rename these rows to “index” and “fieldValue”, then add the following two formulas to the Value column for each row:
User.index= LOOKUP(Prop.fieldValue,Prop.fieldValue.Format)
User.fieldValue = IF(User.index=0,DOCCREATION(),IF(User.index=1,NOW(),IF(User.index=2,DOCLASTSAVE(),DOCLASTPRINT())))
You’ll want to make sure that you’re viewing the cell-formulas, not the cell-values. You can switch between formulas and values via the View menu, or by right-clicking in any ShapeSheet cell.
What do the User-cells Do?
So now that you’ve blindly copied my cryptic formulas into your user-defined cells, let’s talk a bit about what they do.
User.index essentially turns our choice of fields into a number that we can use in other formulas. If, for example, we choose “A” from the list of “A;B;C”, then User.index = 0. If we choose “C”, then User.index = 2. It’s a zero-based lookup.
Since User.index refers to Prop.fieldValue and Prop.fieldValue.Format, it will tell us which item we have chosen from the Field Value drop-down list, in number form.
Using this index value, we can then decide which ShapeSheet function corresponds to the data that the user wants to display. It breaks down like this:
| Prop.fieldName | User.index Value | User.fieldValue Formula |
| Creation Date/Time | 0 | DOCCREATION() |
| Current Date/Time | 1 | NOW() |
| Last Edit Date/Time | 2 | DOCLASTSAVE() |
| Print Date/Time | 3 | DOCLASTPRINT() |
Link the Shape’s Text to the Multi-fields
Now that we’ve set up our data and ShapeSheet formulas pretty well, it’s time to show off our work in the shape’s text.
Insert the Field Name into the Shape’s Text
The first thing we want to do is link the Field Name to the text on the right of the shape. This is a straight-forward process.
- Select the shape
- Go to Insert > Field
- Choose: Shape Data
- Select: Field Name
- Click: OK
The field name will now be shown as text on your shape. If you don’t see anything, make sure you’ve typed some text into the Field Value Shape Data field first!
Insert the Field Value into the Shape’s Text
To link the Field Value to the shape’s text, we do a similar process, but we need to make sure we don’t overwrite our Field Name first. To avoid this, we need to make sure our cursor is at the end of the text stream. These steps will get you there:
- Select the shape
- Press: F2 to enter text-edit mode
- Move the cursor to the end of the text
- Hit Tab to put some space between the fields
- Go to Insert > Field
- Choose: Shape Data
- Select: Field Value
- Click: OK
Your shape is just about ready to use!
Link the Date/Time Formatting to the Field Value
There’s one last thing we need to do in the ShapeSheet to get everything working properly.
You may have noticed that we haven’t used our date/time formatting for anything yet. There’s a nice drop-down list in the Shape Data window, full of odd-looking date/time formatting options, like “M/d/YYY”, but they don’t do anything!
So let’s hook-up the formatting of the Field Value to our date/time stuff. We can do this in the Text Fields ShapeSheet section, which you’ll find if you scroll way down towards the bottom of the ShapeSheet.
There, you’ll notice in the Value column, two old, familar cells: Prop.fieldName and User.fieldValue.
When we did the Insert Field operations, Visio created cell-references in the ShapeSheet that we can now see in the Text Fields section. You should see something like this:
![]()
You’ll also notice that just to the left of the Value column is the Format column. As you might guess, this column can control the formatting of the value in the Value column.
Since the first row holds the Field Name, which is just text, we don’t need to do any special treatment.
But the second row holds our date/time value, which we certainly want to format…according to the choice that the user made for the Date/Time format!
So all that we have to do is reference the value of Prop.dateFormat in the Text Fields section as shown here:
![]()
You can enter the formula by typing “=Prop.dateFormat” into the cell (no quotes), or you can type “=”, then scroll up and click on the actual Prop.dateFormat cell, then hit Enter. Just like you would in Excel.
Your multi-field shape is just about finished. You can now do the following:
- Enter a field name that will be displayed as text
- Select one of four “Smart” date fields that will automatically be updated by Visio
- Select, or manually enter a date/time formatting string to control the look of the date field
A Note about Tabs
As we discussed in the previous Text Block article, this shape works better if the Field Name is left-aligned, and the Field Value is right-aligned.
You can do this by setting text alignment for the whole shape, and then fiddling with the text-ruler to configure the tab that exists between the two text elements.
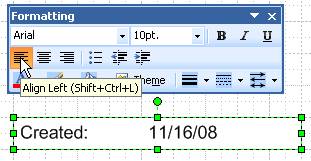
So the first thing to do is select the shape and click the left-align button on the Formatting toolbar. You’ve seen this button in Word and Excel and many other apps as well.
Then, you need to enter text-edit mode, by pressing F2 or double-clicking the shape. If you don’t see the Text Ruler, make sure it is visible by right-clicking (while still in text-edit mode) and checking Text Ruler.
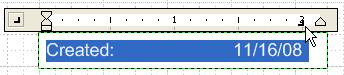
Now, position your cursor just before the second field, and click the little “L” icon on the top-left of the text toolbar, until you get a right-aligned tab icon–sort of a reversed “L”.
Now, click somewhere near the right-end of the ruler. Your Field Value will magically jump to the right-side of the shape.
If you stretch the shape, you’ll need to re-enter text-edit mode and pull the tab stop further to the right. This can be slightly annoying, but there’s no built-in, easy feature that keeps two text elements on opposite sides of a shape.
But not to worry, we’ll discuss how to solve this in a future article.
Extending and Modifying the Multi-fields Shape
Now that you know how to link a series of labels to a series of ShapeSheet functions, you’ll naturally want to extend this shape to include more built-in functions.
The basic process to do this would be:
- Add another item on the end of the list stored in Prop.fieldName.Format. Be sure to include a semi-colon before the new entry.
- Add another level of IF statements to User.fieldValue
Since this article’s example deals with date/time-related functions, it’s best to add only new date/time-related options to this shape, otherwise the formatting might give bad results.
Adding another Value-option
As a bad example to illustrate several points, we could add the shape’s area to this shape. A shape’s area could be calculated with the formula: Width*Height.
So, first we would add the Area option to the drop-down list:
Prop.fieldValue.Format = “…;Last Edit Date/Time;Print Date/Time;Area”
Then we would add the calculation by extending the IF chain. The previously last-formula-in-the-chain now has to react to an index: User.index=3 in this case. The very-last formula then comes as the result if none of the other IF-conditions are met. Here we see Width*Height at the very end of the chain:
User.fieldValue = …,DOCLASTSAVE(),IF*User.index=3,DOCLASTPRINT(),Width*Height))))
Not a huge amount of work. But the problem here is that we will be applying date/time formatting to a decimal value if the user selects Area. Not a good idea if you ask me, but an interesting lesson to ponder at the very least.
Automating the Field Name
While it is nice to be able to independently specify the Field Name from the Field Value, we could save even more time if we just linked the two together.
Since the user chooses the Field Value by picking a name from a list, why don’t we just use this name as the Field Name? You can do this by simply setting the formula for Prop.fieldName as follows:
Prop.fieldName = Prop.fieldValue
That’s all there is to it! The user can still type in a custom Field Name, but by default, they’ll have the automated field name and only have to choose a value and a date/time formatting string.
Whew!
Well I’m glad to see you made it this far. That was a lot of nitty gritty, today. But I hope it was worth it for you, and you’ve gotten a much better understanding of how Visio works, and what makes SmartShapes tick.
If you’re still having trouble getting the multi-field shape to work, you can sneak a peek at some working versions we’ve provided for you.
Download: multi-field-title-block-shape (57 KB)
- © Copyright 2024 D-Tools