SmartShapes Explained
Table of contents
A SmartShape is Worth 1000 Symbols
 The promise of the Visio SmartShape is that one single shape can replace an entire army of symbols.
With a little bit of parameterization, we can clear out the redundancy in our symbol libraries, thereby simplifying maintenance for our developers, and ease-of-use for our customers.
Today’s article will demonstrate just how Visio SmartShapes can do that, and we’ll teach you how to conjure up some of the behind-the-scenes magic that makes it happen!
1×2.00, 1×2.25, 1×2.50, 1×2.75…
Think about your average CAD symbol library: Myriad variations of essentially the same thing, in order to represent all possible real-world, commercially-available, physical sizes.
One look at such a symbol set and we can quickly see that a 4-inch bolt pretty much looks like a 6-inch bolt, except a few lines are somewhat longer. What if we could create a graphic that could react to parameters and replace all that junk with one smart symbol?
Since Visio shapes can be parameterized, we can do just that!
And that’s what we’re here to talk about today. We’ll create a smart speaker shape that can have any possible combination of width and height, yet still maintain its composure. The woofer will look right. The tweeter will look right. Your users and customers will recognize it as a speaker. You’ll only have to create one shape, but they’ll be able to illustrate hundreds of different speakers!
What’s so Great about SmartShapes?
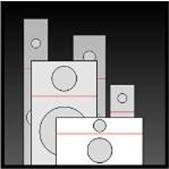
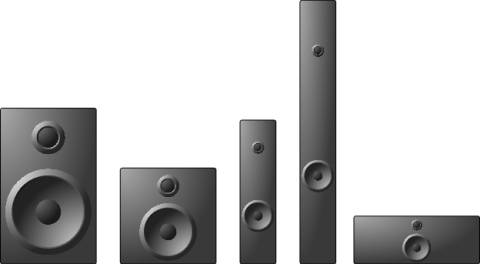
Let’s look at an example of how powerful Visio SmartShapes can be. I’ve created a simple representation of a speaker, with not-so-simple intelligence. The original shape is on the far left.
As I stretch and shrink copies of it, we can see that it behaves rather nicely, and continues to look like a reasonable speaker:
Indeed, the woofer and tweeter stay round, stay well-positioned, and maintain proper relative sizes. In fact, the shape behaves so well, you might not even realize the problem that it is solving.
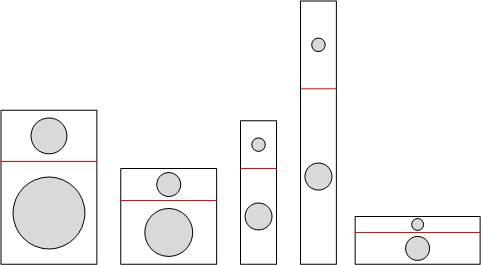
So lets look at what your average piece of clip-art or CAD symbol might do:
Stretch, squish, blah! Maybe some of those artsy-fartsy new iPod speaker-docks might look something like these, but in most cases, you wouldn’t want to present a drawing like this to a client!
Describe the Visual Relationships
So talk about the geometry of a speaker. By accurately describing the essence of what we’re drawing, we’ll be able to formulate geometrical expressions in the ShapeSheet more easily.
So starting off simply, a speaker is a simple rectangle, usually upright, with two circles, one on top of another. The top circle is usually smaller than the bottom circle:
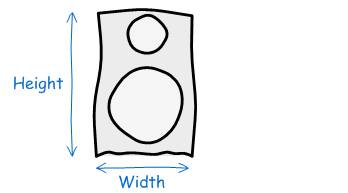
We could say that the top speaker is located in the top third of the rectangle, and it always fits within this space. The bottom circle, therefore fits in the lower two-thirds of the rectangle:
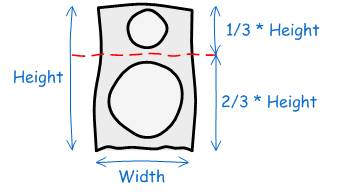
As a result of our one-third, two-thirds breakdown, the centers of the circles are then located at 1/3 and 5/6 of the height of the speaker:
Knowing these relationships will help us to create formulas in Visio’s ShapeSheet that will define the SmartShape. You may decide on factors other than 1/3 and 2/3, but these numbers will work just fine for our example.
Building the Smart Speaker in Visio
It’s time to roll up our sleeves and make this SmartShape happen! We’ll start by roughly drawing the elements of the speaker. Then we’ll identify the IDs of each piece. Finally, we’ll create ShapeSheet expressions to define the smart behavior of our SmartShape.
Rough-out the Speaker
So let’s get going! Using your trusty rectangle and ellipse tools, draw the raw elements of your speaker shape: one rectangle and two circles. You don’t have to draw them accurately, because we are going to “draw by numbers” later. That is, we’ll specify their sizes using more exacting ShapeSheet formulas.
Once you’ve got the pieces drawn, you can group together. Just draw a selection-net around them all, and hit Ctrl+G.
Note the Shape IDs
You’ll want to note the Sheet.ID for each of the shapes, because we’ll need these ids for some of our ShapeSheet formulas.
If you’re not sure about how to figure out the ID of a shape, then read the article: Top 9 Reasons for Turning-on Developer Mode, and pay particular attention to item #8.
Since we’ve grouped three shapes together, we now have four shapes: box, woofer, tweeter, plus the group. If you’ve drawn them on a fresh, clean drawing page, you’ll have IDs that look something like mine:
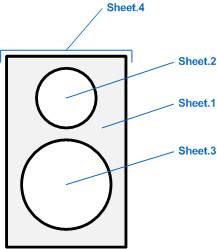
Speaker box = Sheet.1
Tweeter = Sheet.2
Woofer = Sheet.3
Group = Sheet.4
Note, that even though we’ve grouped the shapes together, we can still work with all of the pieces without ungrouping them. We simply have to sub-select a shape to work with it.
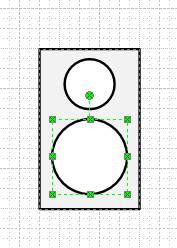
In order to sub-select a shape, first select the group as shown here:
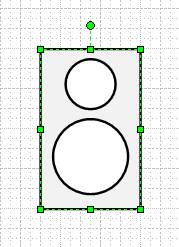
Then, after a slight hesitation, click again on one of the group’s members. You’ll see slightly different, lighter-green handles with Xs in them. This helps you to recognize that a shape is sub-selected and that it belongs to a group:
Set the Locations of the Speakers
Now it’s time for some ShapeSheet-ing! Since we’ve already determined where the locations of the speakers should fall, let’s set the position of the circles by setting the formulas in their PinX and PinY cells…
Since we set formulas in ShapeSheet cells, it would be nice to have one in front of us before we go any further.
So just sub-select your woofer circle, then choose the menu: Window > Show ShapeSheet. Up will pop a ShapeSheet window that describes the woofer sub-shape.
In the ShapeSheet window, make sure you’re looking at formulas, not values. You can set this via the View > Formulas menu item. You’ll also want to be sure that the Shape Transform section is visible. You can set this via: View > Sections…
Once you’ve got it all configured, your raw woofer-ShapeSheet should look something like this:
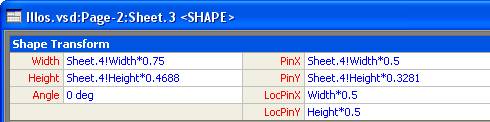
You can see how the Width, Height, PinX and PinY cells have formulas that reference the group. That’s the “Sheet.4!…” bit at the beginning of each formula. You’ll remember Sheet.4 from earlier as being another name for our group.
The PinX and PinY cells control where the circles are located. By default, they are located relative to the group using a proportion of the group’s Width and Height.
Again, if this is looking a bit too scary, go and check out John Goldsmith’s article: Just for starters to get a great introduction to what we’re going on about.
What we want to do is change these formulas for the woofer and tweeter so that they match our 1/3*Height and 5/6*Height locations that we talked about earlier.
So set the PinX and PinY formulas for the woofer and tweeter as follows:
Woofer location:
PinX = GUARD( Sheet.4!Width * 0.5 )
PinY = GUARD( Sheet.4!Height * 1 / 3 )
Tweeter location:
PinX = GUARD( Sheet.4!Width * 0.5 )
PinY = GUARD( Sheet.4!Height * 5 / 6 )
Notice that both PinXs are the same. That’s because they’re both centered within the group – located at 0.5 of the group’s width.
You’ll also see that I’ve wrapped the formulas with GUARD(…) This protects the shape from being moved by a user. Go ahead and sub-select the tweeter and try to move it. You can’t! You can still resize it though, because we haven’t nailed down the sizes yet.
Set the Sizes of the Speakers
Setting the size of the circles will be a bit trickier, but we can simplify some the work by noting two things:
- The circles are round, so their heights are the same as their widths
- The tweeter will look good if it is always a percentage of the woofer’s size
So we can set the Height to equal the Width for both circles. That takes care of half of our problem. Then we can make the tweeter’s Width be a fraction of the woofer’s. That leaves only the woofer’s Width to be dealt with.
Take a look at the “first stab” formulas I’ve created below:
Woofer size:
Width = GUARD( MIN( Sheet.4!Width, Sheet.4!Height * 2/3 ) )
Height = GUARD( Width )
Tweeter size:
Width = GUARD( Sheet.3!Width * 0.75 )
Height = GUARD( Width )
The Heights equal the Widths. The tweeter’s Width is 75% of the woofer’s. A little bit harder, because we needed to know that Sheet.3 was the woofer, and had to construct a more complicated formula, but this is still fairly easy.
But the woofer’s Width? Whoa!
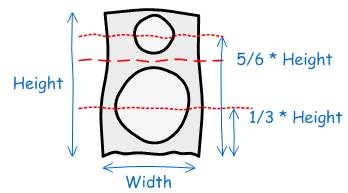
You see, the woofer needs to fit into a space that is either as wide as the speaker box, or as tall as two-thirds of the speaker box’s height.
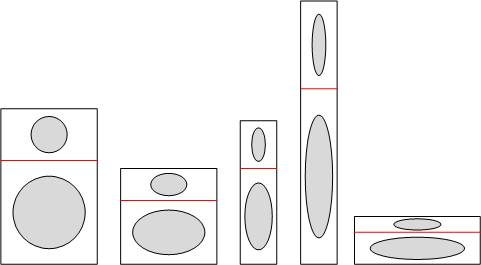
We can see this illustrated below:
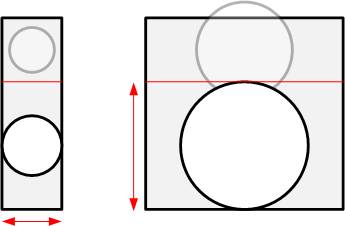
In the left case, the speaker is tall and thin, so the width of the speaker box limits the size of the woofer. In the right case, the speaker is low and wide, so the woofer is limited by 2/3 * Height. So our formula takes the minimum of the two limiting possibilities.
You’ll notice that this shape doesn’t quite look right:
- The woofer goes right up against the sides of the speaker box, which isn’t nice
- The tweeter, while smaller than the woofer, can still be too big for its space
So we need to do some more tweaking of the formulas.
Set the Sizes of the Speakers…Again
What I did was to add a factor to the end of the woofer’s Width expression: I multiplied it by 0.75. This puts a little bit of space between the woofer and the speaker box.
But the tweeter was still a bit too big in some instances, so I just decreased it’s size to be one-half that of the woofer:
Woofer size:
Width = GUARD( MIN( Sheet.4!Width, Sheet.4!Height * 2/3 ) * 0.75 )
Height = GUARD( Width )
Tweeter size:
Width = GUARD( Sheet.3!Width * 0.5 )
Height = GUARD( Width )
With these formulas, the speaker will behave like those shown at the very beginning of the article.
Using the Speaker
Now that the shape will survive resizing of any kind, you can turn it use on your users without fear.
But since your users are likely to be drawing to-scale elevation views, they’ll probably want to enter real-world sizes for the width and height of the equipment.
One quick way to enable this is to use the Size & Position window. You can make this available from the View menu. The Size & Position window contains fields for Width and Height, into which users can enter real measurements in any number of units.
An even nicer way to specify the size of the speaker is to link the Width and Height cells to Shape Data fields. In the ShapeSheet, it might look something like this:
Width = GUARD( Prop.EquipmentWidth )
Height = GUARD( Prop.EquipmentHeight )
Where you create the Shape Data fields: Prop.EquipmentWidth and Prop.EquipmentHeight yourself.
We could even use Visio’s data-linking features and link either the Width and Height, or the Shape Data fields to actual data from a database or an Excel spreadsheet.
Companies like d-Tools have built full-blown solutions that use shapes like these connected to their own custom data sources and user-forms, thus making the setting of the data painless and appropriate to the problems their software is solving.
I could go on and on about this, but perhaps this is food for future Visio Guy articles!
Sprucing Things Ups
Now that you know the essence of setting up the smarts, you can apply them to nicer looking elements. If you’ve read: Create Better-looking, More-efficient SmartShapes, you’ll have some ideas on how you can make much more realistic looking woofers and tweeters.
And once you’ve created them, you can group them together with a nicely-formatted rectangle, and apply the same ShapeSheet formulas that we talked about today.
You can build one, very good looking speaker shape that can do duty for many, many different sizes of speaker.
Imagine if you had to draw a new speaker for each different size of equipment you needed to illustrate! And imagine having to manage the library of all those shapes–especially when your boss says; “we need to change one little detail…”
With Visio SmartShapes, that “one little detail” truly remains both “one”, and “little”!
For more useful Visio information, please visit VisioGuy.com.
- © Copyright 2024 D-Tools