Draw Glass in Visio
Table of contents
How To Draw Glass in Visio
Originally published here: http://www.visguy.com/2008/03/18/how...lass-in-visio/
Today we’re going create a glass effect, using basic end-user features of Visio. With a few simple techniques, you’ll be able to add pizzazz to your elevation drawings of windows, cabinetry, video monitors, rack-systems.
Now, maybe you’re thinking; Visio is not Adobe Illustrator, and Visio diagrams are supposed to be simple, boring, and utilitarian. A quick glance at this site might bring you to question that notion. But don’t just take our word for it…
Welcome D-Tools Newsletter Subscribers!
Today we’d like to welcome the readers of D-Tools monthly newsletter!
This article is written with D-Tools customers in mind, as we embark on a 9-part series of basic, intermediate and advanced Visio topics that will not only be of particular interest to d-Tools SI fans, but also of value to Visio end-users and Visio solution developers as well.
So welcome D-Tools users! We hope you enjoy www.visguy.com, and that we can help you to get the most out of Visio!
Let’s Draw Some Glass
Before we start the step-by-step, how-to bullet-lists, let’s look at some examples of what we’d like to accomplish.
Shiny Display
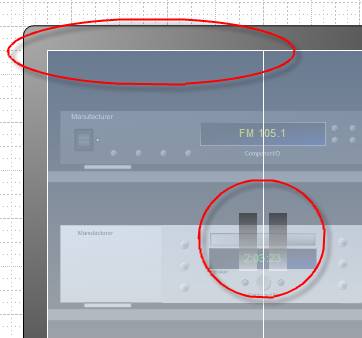
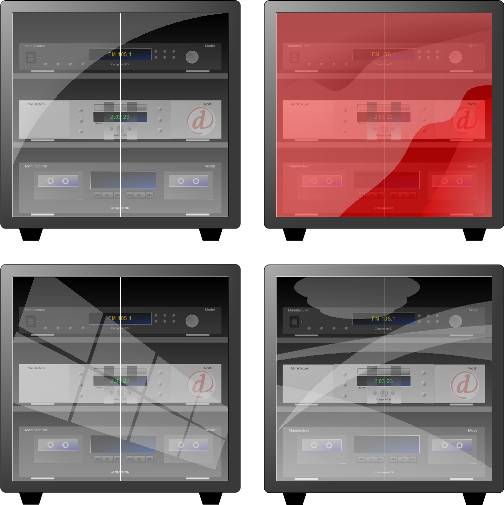
Below we’ve got three versions of a video monitor, hanging on a wall in (in a trendy neighborhood…)
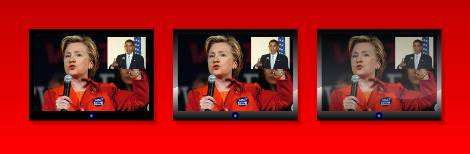
The first monitor has no glass effect. It is just a black rectangle, a Hillary-rectangle, and a Barack-rectangle.
The second has a shiny-effect on the bezel, but the picture is still just an imported image.
The third display adds a subtle glass effect over the picture. What’s nice about this is that it de-emphasizes the picture, [insert joke here] so we can better focus on the display as a piece of equipment.
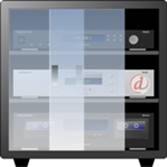
Glass Doors
The techniques used on the display are the same that we’ll use to create glass doors for a video-equipment cabinet. But this time, we’re going to pull the glass bits off of the shape, so that you can get a better look at how we’re creating the glass:
It’s Just Gradient Fills and Transparency!
Well, that makes a bit clearer, doesn’t it? You can see that we’re just using gradient fills, with a splash of transparency.
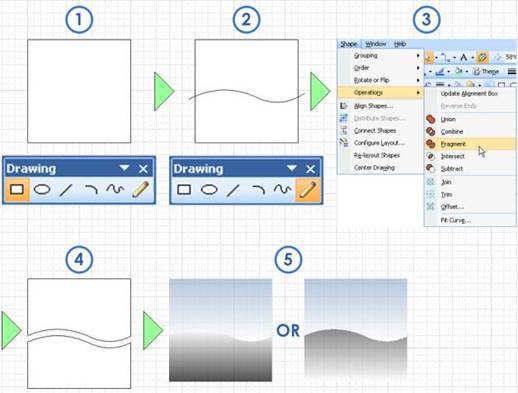
Let’s break-down the doors on the left, since they are a bit simpler. We can accomplish this effect with just a few steps:
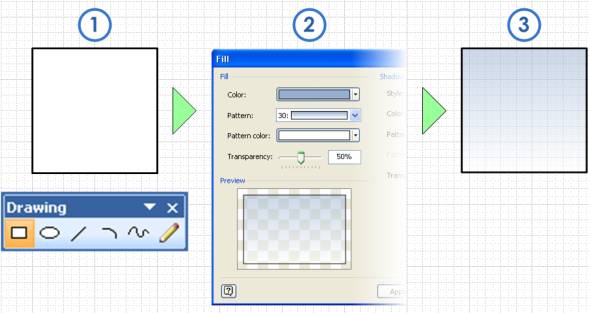
1. Using the Rectangle Tool, draw a square
2. With the rectangle selected, choose the menu: Format > Fill.
Here we can choose a gradient fill pattern – 28 or 30 work well. Then choose a nice sky-blue color, and fade it to white.
In this dialog, we can also choose a value for transparency. 0% means we can’t see through the shape, 100% means we can’t see the shape at all!
3. Voila! You’ve got a basic piece of glass! Just place it on top of whatever should be behind the glass.
The keen-eyed among you may have noticed a few more details. Namely, the doors have white lines on the top and left sides, and they also have handles.
The white lines were simple enough to create: just use the Line Tool to draw two L-shapes, starting at the bottom-left, and ending at the top-right, where each door should be. Reduce the line-weight a bit, then give them a white line color.
The handles are just as easy. They are simply resized-copies of the glass shapes themselves, but with black substituted for the blue! The transparency of the shapes creates cool effects as you layer them on top of each other.
So we’ve created some nice-looking effects with nothing more than rectangles, lines, and a few formatting effects!
Boolean Operations on the Horizon
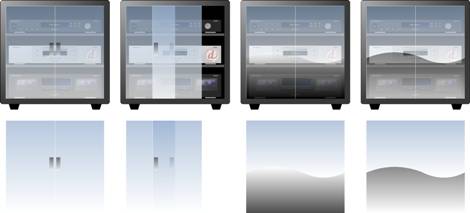
The cabinets on the right have doors that require a little more work. While they use gradient fills and transparency that we’ve just learned about, there’s a bit of a wave cut into them, and they use different colors for the shading.
Visio has some nifty features that are esoterically named: Boolean Operations by the Math Guys.
What Boolean operations allow you to do is:
· Slice shapes into pieces
· Trim lines into segments
· Blend pieces together
· Remove smaller bits from larger bits
You’ll find these Boolean operations under the Shape > Operations menu. They have the following names: Union, Combine, Fragment, Intersect and Substract.
1. Using the Rectangle Tool, draw a square
2. Use the Pencil Tool or the Freeform Tool, draw a wavy line across the square.
This represents a reflected horizon in the background.
3. Cut the rectangle using the curve by selecting both shapes, then choosing Shape > Operations > Fragment.
4. You can see that you now have two shapes
5. Format each shape with transparency and a gradient fill. For the top piece, blue-to-white works nicely, and for the bottom piece, black-to-white, or white-to-gray works well.
Oh yeah, and once you’re done with the effects, select all of the pieces and group them together, so they’re easier to move around and re-use. You can group shapes via the Shape > Grouping > Group menu, or just hit Shift + Ctrl + G to get it done more quickly!
Glass Theory
The notion of a horizon being reflected in the glass makes more sense for rooms with really big windows, or for drawing windows on the exterior of a building.
In theory, colors ought to be a bit more faded as they move off into the distance, due to the increasing amount of air and haze. But since this is a stylized effect, we don’t have to be so Physics Professor about it.
For drawing cabinet doors or shiny equipment, you might go with all-black or shades of gray, like the displays at the beginning of the article use. But experiment and ttry some weird shapes as reflections. As long as you use gradients and transparency, you’ll maintain some sort of glass-look. Experiment and have fun!
Future Topics
Well, I hoped you’ve enjoyed today’s tutorial, learned something, or gotten some cool ideas for your projects.
In the near future, we’ll be diving into Visio’s ShapeSheet interface to create more advanced effects, and to make smart-frames for containing our panels of glass. These can be resized in any dimension, but maintain a consistent frame-width. In other words, they don’t freak out when you stretch them.
If there’s anything in particular you’d like to see in future articles, or something here that didn’t make sense, don’t hesitate to leave a comment at the end of this article, or send us a message via the Contact Form!
- © Copyright 2024 D-Tools