Clean Visio Shapes
Create Clean & Tidy Visio Shapes Using Images With Transparent Backgrounds
You might already know that you can create Visio shapes by using already-existing images, bitmaps and photos.
But making good-looking drawings that use images takes more than just a download here and an import there.
You want your images to look and behave more like genuine Visio shapes. To get this job done right, you’ll need a few more tips and tricks, so read on!
Great Shapes Already Exist!
You don’t need to always draw your Visio shapes from scratch. Just go to Google, type in the name of a piece, then click Images.
Unless you’ve been in a cave for the last five years, I don’t need to tell you that you’re likely to be presented with a whole host of decent-quality images for the object you want to illustrate:

The good news is that you can import these images into Visio and use them as shapes! The bad news is that a lot of images come with unwanted background clutter. This clutter can make a drawing look less professional, unclear and make it hard to look at.
For example, here is a line drawing I quickly made by importing images I found on the web:

Very simple to do, but you can see that (despite my efforts to put thick, black lines around each shape) it still looks cluttered, and less-than-tidy.
Wouldn’t it be nice to have the line drawing look more like this?

This new, improved version was done using Visio, the .png image format, and a little bit of image editing.
It is a little-known fact that Visio supports transparent backgrounds in .png files. This is easy to overlook, because folks often try to import an image via copy and paste, which results in a white background. But if you import a .png file with a transparent background from disk, everything works fine.
I’d like to share with you a few tips and tricks that I use to clean up .png images for use as Visio shapes.
Clip the Image
Once we’ve got an image that we want to use as a shape, we’ll want to isolate–or clip–the image by removing the background junk. To do this, we need an image editor with capabilities beyond the Paint application that has shipped with Windows since the early 1400s.
Two candidates that come to mind are the venerable, top-of-the-line Adobe Photoshop and the up-and-coming Paint.Net. Paint.Net has less features than Photoshop, but it is free. Of course, Paint’s creators will gladly accept a donation if you find it really valuable to your work.
At any rate, Paint.Net will suffice to get our images cleaned up, and many image-editors have features similar to those I will talk about today.
Erase
The first thing I like to do is quickly and roughly erase the bits that are easy to get at. We don’t want to spend time zooming in and attacking pixels one-at-a-time, this is just a rough operation.
Paint.Net has an Eraser tool. You can increase and decrease the brush width to make your work go faster. As you erase, your image will get cleaner and simpler:

The checker-board pattern that you see above represents “nothing” or transparency. When you import a .png file into Visio, the checkerboard areas will be see-through, which is just what we want.
Magic Wand
Once you’ve gotten rid of the rough bits, you can try using the Magic Wand tool to finish cutting out the outline. Magic Wands select similarly colored, contiguous pixels.

If the background of your image is fairly consistent in color, and it is a different color than that of your subject, then the Magic Wand will really save you a lot of time.
Here we’ve set our Magic Wand’s tolerance to 35% and selected the wooden table behind the Crestron touchpad:

That worked pretty well–we’ve got a nice chunk of the background selected, and haven’t marked any of the touchpad itself. Now we simply delete the selection and try the Magic Wand on the rest of the background bits.
If we increase the tolerance too much, then both background and subject get being selected, which won’t do us any good:

So you’ll have to play around a little bit with the settings and stand ready at the Undo command.
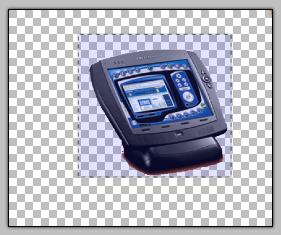
Note: if your image’s background is fairly consistent, you might skip the erase step and go straight for the Magic Wand! For instance, this tuner had a simple, white background, which I’ve colored blue to make it easier to see:

With the Magic Wand, it was child’s play to get rid of the background in one, simple step:

Drawing Masks
Some image editors have a way of selecting an area by drawing a polygon. I couldn’t find this feature in Paint.Net, so at some point I had to do some zooming-in to clean-up bits not taken care of by the Magic Wand or rough erasing. Paint.net has Rectangle, Ellipse and Freehand selection tools which will help in many instances, but a Polygon selection mode would have really come in handy.
Now that we have isolated our image and gotten rid of the unwanted background, we need to crop the empty space around it. There’s no sense in wasting disk space for empty bits, plus it is nice to have our Visio shapes more closely match the boundaries of the objects they represent!
Final Checks Using Paint Bucket
The checkerboard pattern shows you where your image will be transparent, but it also makes small bits that you might have missed hard to see.
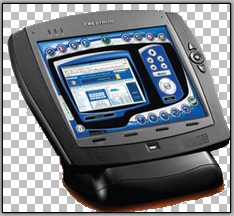
For that reason, I’ll dump a color into the transparent area using the Paint Bucket to uncover any pixels I might have missed. Here we can clearly see that I’ve missed a few pixels near the touchpad:

After I dump the color, I note where the errant pixels were, quickly hit Ctrl+Z to undo the fill, then use the Eraser tool to get rid of the stray pixels.
Crop the Image
Now that we’ve got a transparent background, it’s time to crop the image to get rid of unnecessary extra space.
There are many ways to crop an image, let’s talk about a few of them:
Crop using Paint.Net
- Select the Rectangle Select tool from the toolbar
- Draw a rectangle around the remaining bits of the image, as close as you can get to the edges
You’ll see a shaded area with a flashing marquee that looks like this:
- Select: Image > Crop to Selection
Your image now be cropped, and the extra space is gone
- Save the file as a .png to preserve the transparent background
Crop using Microsoft Office Picture Manager
- Save the Paint.Net file as a .png file, so that the transparent background is preserved
- In Explorer, right-click the file and choose: Open With > Microsoft Picture Manager.
- Find the Crop function and crop the image as tight as you can
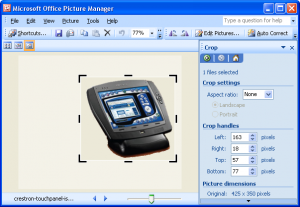
- Save the modified file
You might not have Microsoft Picture Manager installed. It comes with Office 2003 and Office 2007, but I can’t say if it is included or not included with Office Standard, Pro, or Ultimate.
You could also right-click and choose: Open With > Paint, but good ol’ Paint doesn’t seem to understand transparent backgrounds, or at least not very well. On my machine, the transparency just came in to Paint as black, which just made a big mess of everything!
Import into Visio
You could copy the image directly from your image editor into Visio, but you might lose the transparency information.
I’ve found that importing images into Visio from files generally works better for a number of reasons, which you can read about in: Effects of Imported Images on Visio File Size.
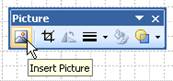
Importing into Visio is just a matter of going to: Insert > Picture > From File. There’ also a handy-dandy toolbar item for this, located on the Picture toolbar:
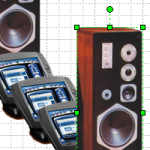
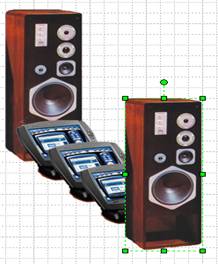
With transparent backgrounds, your Visio drawings will simply look better, and you’ll be able to do more “shape-like” things like overlapping shapes:
There are lots of other techniques for clipping images from their backgrounds, but I hope I’ve shown you a few, simple techniques that will help you quickly get the job done without having to pull you away from your main business and retrain yourselves as Graphic Artists.
- © Copyright 2024 D-Tools