Use Background Images
Table of contents
Importing Images as Backgrounds for Scaled Drawings in Visio
[1]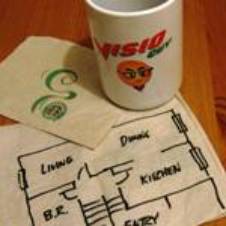 [2]You’ve already got your plan…but it’s only available in paper format. Not to worry, you scan it and use it in your scaled Visio drawing anyway!
Recently, we talked about techniques for using images as backgrounds for tracing vector-based Visio shapes in the article: Importing Images as Backgrounds for Tracing. What that article didn’t cover were issues related to scaling.
In today’s article, you’ll learn how to quickly import an image of a measured drawing and configure it for used in a scaled environment!
Quick-and-dirty Floor Plans Are People Too! While it’s great to have precisely-drawn, CAD-created floor plans—plum full of vectors that print beautifully—they aren’t always available. Often times, they exist only on paper…and even then, only after you’ve sketched them out yourself on quadrille paper.
There are many tasks that can be performed with a scaled floor plan that don’t depend on a high-quality rendition of that floor plan. Rearrangement of furniture, layout of office cubicles, the planning of that new Home Theater and the wiring that it will require—all can be done on very simple floor plans, as long as they are drawn and scaled to a reasonable accuracy.
Visio Drawings Can Be Scaled If you use Visio for creating floor plans or other CAD- and engineering-related tasks, you know that Visio can handle a wide variety of scales. You can enter custom scales such as: 1in = 3.57 in, 1cm = 2m, etc., or select from a bevy of standard scales for Architecture, Civil Engineering, Mechanical Engineering or Metric applications. This allows you to easily work in a measured-drawing environment, just like in CAD. You don’t have to do any math in your head.
If you have a drawing in AutoCAD or DXF format, then Visio will help you with scaling when you import it. For more on the fine-details of working with Visio and AutoCAD, see: Visio & AutoCAD.
But if only have a paper-drawing, or a scanned image to work with, you’ll need to do a little more work to get everything properly set up for working to-scale.
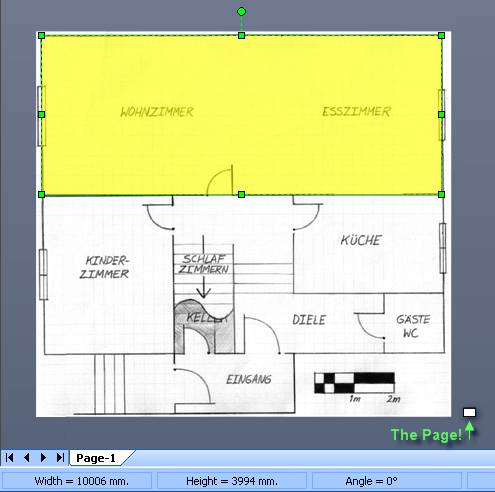
Import That Image! But enough with the introductory stuff. Let’s roll up our sleeves, and like so many politicians, get to work! Below we see a floor plan of the house we’re staying in, just outside of Vienna.
I whipped this up Old School style, using a pencil *gasp*, ruler, and some graph paper. Yeah I know, I know…
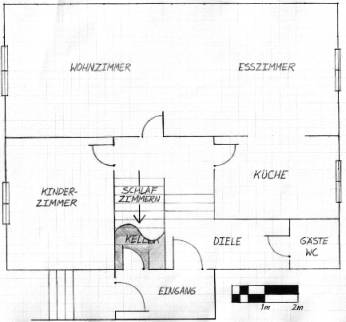
In addition to the amazing draftsmanship, you’ll notice that there’s a scale indicator in the lower-right corner that shows us how big 2 meters (meters: say YARDS) is supposed to be. This will come in handy in a few minutes.
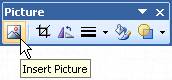
Getting this picture into Visio was simply a matter of clicking the menu: Insert > Picture > From File… or clicking the Insert Picture button on the Picture Toolbar, then browsing for the desired image file.
Resize That Image! In this example, I started with a default drawing page, which for metric environments is A4: 210mm x 297mm.
When I imported the image file: HausPlan.png, it came in at slightly larger than the page:
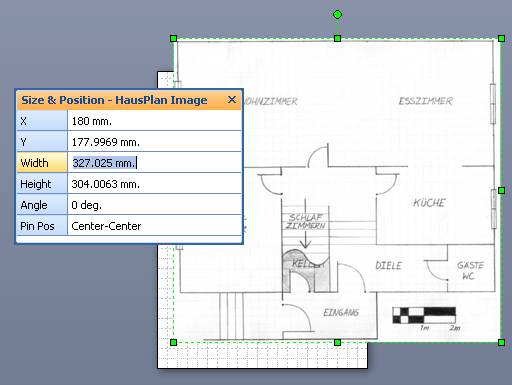
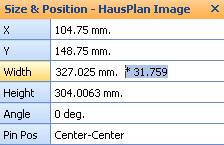
Pulling up the handy-dandy Size & Position Window (via: View > Size & Position Window), we can examine the size of our new floor plan shape. You can see in the Width and Height fields that the image is only 327mm x 304mm!
Things are cramped here in Europe, but not that cramped!
Clearly, we need to resize this image. And the fields in the Size & Position window will make this a breeze. So the next question is: By what factor do we resize the image?
Calculate a Scale Factor Earlier, I mentioned the scale indicator in the lower-right corner. Let’s focus our attention there, since this is our link to the scaled world represented in the plan.
If we zoom in as much as possible, we can draw a rectangle next to the scale indicator. For accuracy, zoom in as far as you possibly can, and get the edges of the rectangle right on the center of the lines in the image.
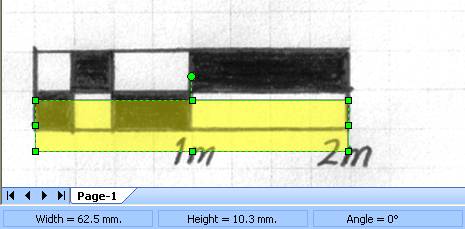
When drawing the rectangle, it helps to turn off snapping to rulers and grids, so you can really accurately trace over the image.
You can turn the ruler & grid off via: View > Grid and View > Rulers. Or click the Ruler and Grid toolbar buttons on the View Toolbar. You can also toggle snapping via the Toggle Snap button on the Snap & Glue Toolbar. Keyboard shortcut addicts will just hit: Shift + F9 to toggle snapping on and off.
If you switch back to the Pointer Tool (Ctrl + 1) after drawing the rectangle, but leave the rectangle selected, you’ll notice another place where size information shows up: the Status Bar in the lower-left corner of the Visio window.
By the way, you can learn all about the many ways to get Visio shape size information in this article: How Big Is My Shape?
So, looking at the screenshot above, we can see that the rectangle is 62.5mm wide, but it needs to be 2m wide! We could get all mathematical and write something like:
Width = 62.975mm à 2m = 2000mm
And this is where we’ll get our scale factor. The factor by which we need to multiply our image’s width and height is the ratio of the IS and SHOULD-BE numbers written above. So:
Scale Factor = 2000 / 62.5 = 31.758634378721714966256450972608 ≈ 31.759
So we just need to multiply the Image’s width and height by 31.759!
Resize the Image Once again, the Size & Position window comes to the rescue. As it turns out, the fields in this window understand math, so we can simply multiply directly in the fields themselves!
We just select the image shape, then append * 31.759 to the Width and Height values. Visio recalculates as soon as you leave a field or leave the window. Here’s an example:
After changing the size of the floor plan, you’ll notice that the shape becomes VERY LARGE! But no time for gawking, let’s check our accuracy! We can ZOOM WAY OUT and have a look at what we’ve accomplished.
(Incidentally, if you do a lot of zooming, you’ll want to Work Faster With Our Top Visio Keyboard Shortcuts)
After we’ve zoomed out, we can draw another rectangle over the top of one of the rooms, and see if its size makes any sense at all. Below, I’ve traced the living/dining room, which I happen to know is 10m x 4m. Glancing down at the Status Bar, you’ll see that we’re off by 6mm in both directions. This is more than accurate enough for many, many layout tasks.
But there’s still one problem remaining. Notice way down and to the right is a teensie-weensie, white rectangle. THAT is the page, still with A4 dimension, at a 1:1 scale.
Set the Drawing’s Scale We need to give our page a scale, so that it can accommodate the extents of our drawing. We don’t want to change its “A4-ness”, just the value that 1mm represents on paper.
Before we start, let’s make a quick note of the size of our image. Select it with the Pointer Tool, then glance down at the Status Bar, or in the Size & Position Fields.
In our Haus example, we now have:
Width = 10385.987mm ≈ 10.4m
Height = 9654.936mm ≈ 9.7m
Let’s keep those values in mind for a few seconds.
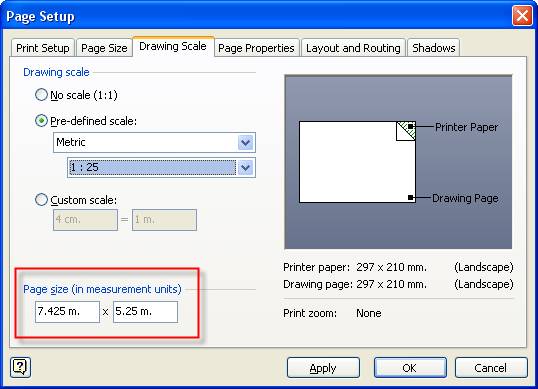
No we’ll go to: File > Page Setup > Drawing Scale Tab, where we can set the Drawing Scale in the Page Setup Dialog,
We click the Pre-defined scale radio button, and in this case, we select Metric from the first drop-down list. This narrows our choices of scales in the second drop-down list to those that make sense for metric drawings.
Notice that as we select different scales, such as: 1:5, 1:10, 1:20, 1:25, 1:50, 1:100, the page size in the lower-left corner changes.
Here, I’ve selected 1:25, and I am notified that the page will be 7.425m x 5.25m. Not quite big enough for our floor plan.
If I continue on to the next scale, 1:50, we can see that the drawing will be 14.85m x 10.5m. This is big enough to hold our Haus Plan, so I go with a scale of 1:50.

You can see that the page size fields are extremely useful aids when selecting a drawing scale!
You can also type desired page-width and page-height values directly into these fields, but that can easily end lead to odd paper sizes if the aspect ratio doesn’t match your printer’s paper.
Working at Scale The final test was to add some furniture to my floor plan. I whipped open the furniture stencil, located under: Shapes > Maps & Floorplans > Furniture, and dropped some shapes into our living room:
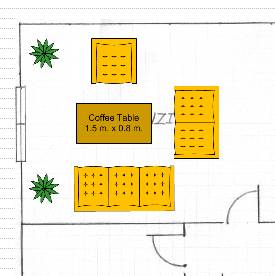
As you can see, the seating and coffee table pass reasonably well in the living room!
Epilogue Now that you understand how to configure and work with image backgrounds in scaled drawings, there are some other tips that will enhance your work flow. These are covered in detail in the afore-mentioned article:
Importing Images as Backgrounds for Tracing, but I’ll list some highlights here:
· Place the image on a Layer and lock the layer, so that you don’t continually select the image and accidentally move it.
· Give the image transparency to de-emphasize it, and allow the grid to show through. This is especially useful if you plan to trace-over the image with vectors, or if your image has lots of distracting colors or details.
· Consider the format of your image before you import it. JPGs and PNGs are generally more efficient in the
Visio file than are BMPs. More details here: Effects of Imported Images on Visio File Size
This article was written by Visio Guy with D-Tools customers in mind. You can post and read comments about this article at its Visio Guy location: Importing Images as Backgrounds for Scaled Drawings
- © Copyright 2024 D-Tools