Configuring QuickLinks
Table of contents
Initial Configuration QuickLinks
QuickLinks is our interface to QuickBooks and is an additional, optional license. If you have purchased a QuickLinks license, no additional installation is required. QuickBooks must be installed on the machine where you intend to use QuickLinks. If you install QuickBooks after you have installed SI5, follow the instructions here to install the add-on. The following steps show how to configure QuickLinks for use on Client installs.
Note: You may see QuickLinks referred to as LinkTools or as LinkTools-QuickBooks in some of our documents and videos. They are the same thing.
- Verify that you have a QuickLinks license for your company: “QuickBooks Enabled” will display on the Start Page of the SI 5 Administration Console. If you have recently purchased the QuickLinks module, click the [Check for Updates] button.
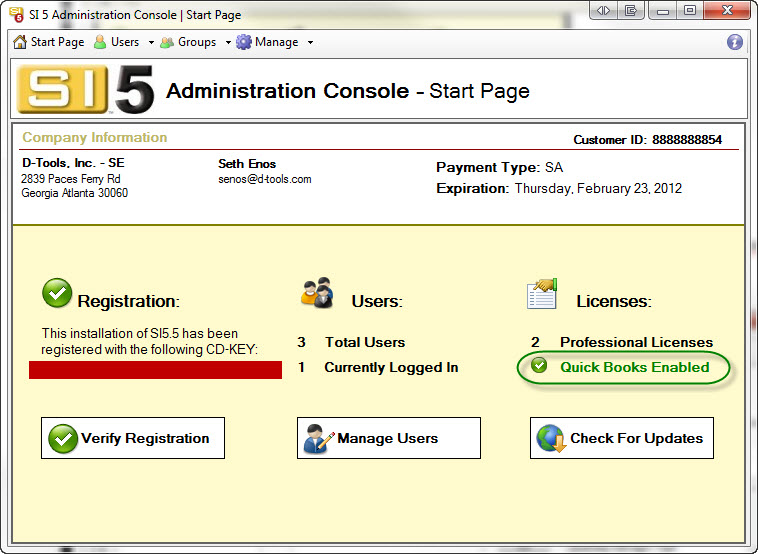
- Click the [Groups] button and verify that your User is assigned to a Group that has the “Allow QuickLinks” permission:

- Open QuickBooks and login as “Admin” and be in "Single user mode". This is necessary to make the initial connection between SI5 and QuickBooks. You do not need to be logged in as “Admin” to use QuickLinks in the future.
- Open SI5 and login.
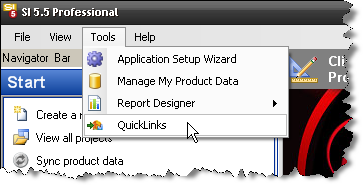
- Select Tools->QuickLinks
- You will be prompted to select your region:

- The D-Tools Quicklinks form will open. Click the [Options…] button:
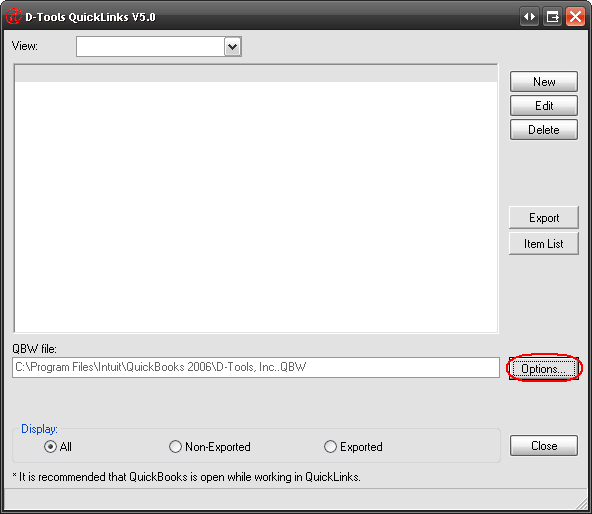
- The following form opens. Use the [Browse…] button to navigate to your QuickBooks company file and set your default options, details below.
Note: Your QuickBooks company file does not need to be on the same machine that you working from, it can be on a server on your network. The path you use here must exactly match the path to the company file that you have open in QuickBooks. For example, say in QuickBooks you are mapped to the path Z:\Shared Files\Intuit\CompanyName.QBW, and in this QuickLinks form you are mapped to \\MachineName\Shared Files\Intuit\CompanyName.QBW. While technically the same file, you will receive an error stating that another file than the one you are attempting to open is already open in QuickBooks. The fix is to change your path in the QuickLinks form to Z:\Shared Files\Intuit\CompanyName.QBW.
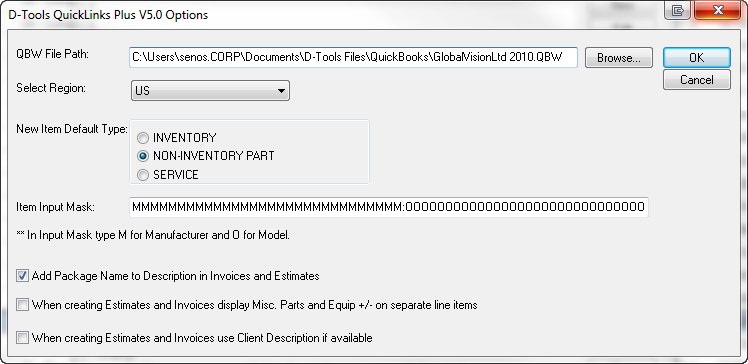
Select Region - the choices here are US, Canada, and UK. No need to change this after initial setup.
New Item Default Type - Choose either Inventory, Non-Inventory Part, or Service. Most likely you will be choosing either Inventory or Non-Inventory Part.
Item Input Mask - defines the way QuickLinks names and groups SI5 items in QuickBooks. The mask is of the form:
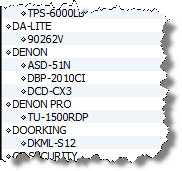
MMMMMMMM OOOOOOOOOOOOO, where the number of “M”s represented the first number of characters of the Manufacturer name. The “O”s represent the first number of characters of the Model number. If a colon “:” is used as the separator character, all Models will show up as a sub-item of the Manufacturer in QuickLinks:
While this provides a nice hierarchical view of the items in QuickBooks, it is restrictive in the sense that all sub-items must be of the same type (Inventory or Non-Inventory) as the parent item. To use this mask, enter thirty "M"s, a colon, then thirty "O"s: MMMMMMMMMMMMMMMMMMMMMMMMMMMMMM:OOOOOOOOOOOOOOOOOOOOOOOOOOOOOO
If you ever wish to mix Inventory and Non-Inventory parts within a Manufacturer, use ANY separator other than a “:”, such as a space. The non-colon separator provides the most flexibility for item assignment. However, when using the non-colon separator, you are limited to thirty characters total. For example, you may choose to have ten "M"s, a space and then nineteen "O"s as your mask: MMMMMMMMMM OOOOOOOOOOOOOOOOOOO
Add Package Name to Description in Invoices and Estimates - This option will add the package name from SI5 to the end of the item description over in QuickBooks on Invoices and Estimates. Since packages in SI5 are not linked to "packages" in QuickBooks, and rather each individual part in the package is linked to an individual Item over in QuickBooks, you may wish to check this option so there is an indication that the item is part of a package.
When Creating Estimates and Invoices display Misc. Parts and Equip +/- on separate line items - If you are using either or both of these percentages in SI5, you can choose to have them display on separate line items in QuickBooks. If this is not checked, the adjustments will be rolled into the price of each line item vs. being on its own line item. For information on these two fields, see here.
When Creating Estimates and Invoices use Client Description if available - check this box if you wish to use the longer Client Description vs. the Product Description for Estimates and Invoices in QuickBooks. For information on these two fields, see here.
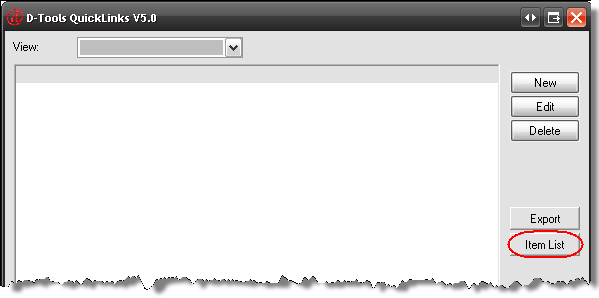
- Click the [Item List] button:
- If the QuickBooks window does not gain focus automatically, click it on your Task Bar. The following window will be open. Click the “Yes, always; allow access even if QuickBooks is not running” and set it to "Login as:" Admin:
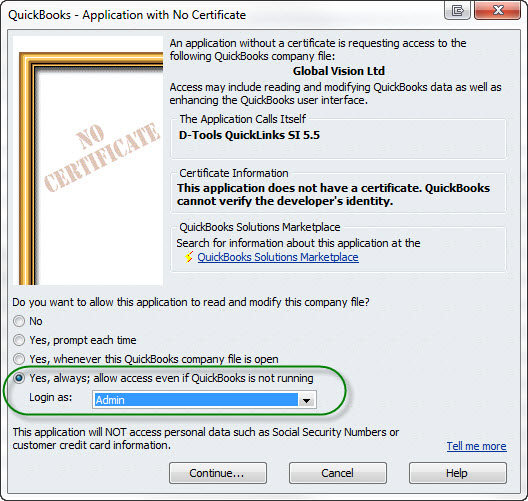
Note: If you do not see the "Login as:" dropdown, then you only have one user setup and it is already set to login as Admin.
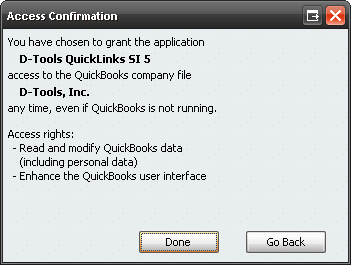
- Click [Continue…]. You will be prompted to allow access:
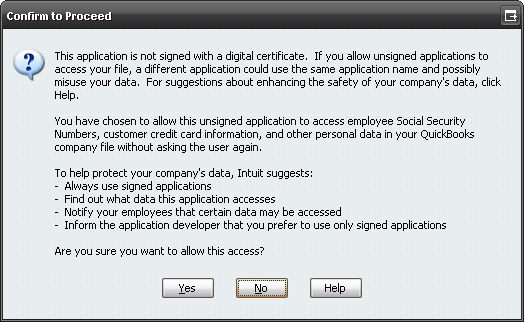
- Click [Yes] and then click [Done] when prompted:
QuickLinks is now configured and ready to use. The next step is linking your SI5 Products to Items over in QuickBooks, or allowing SI5 to create new Items over in QuickBooks. See the QuickLinks section for details on using QuickLinks.
- © Copyright 2024 D-Tools